Want to make a recording of your computer’s screen and narrate over what is being shown on the screen? Perhaps a quick How-to video for your students or peers? Record a PowerPoint that you narrate for someone to view at his or her leisure? Record a lesson to place into Pilot? All you need is a 6 years old or newer Mac or MacBook (or even an older Mac that has been upgraded to at least Mac OS X 10.6 or newer) If that is the case You have everything you need record your screen and narrate the recording!
Find your Applications Folder (or press the Apps button on your Keyboard) and then look for QuickTime Player and open it.
(If QuickTime offers to open a file for you at this point, just click cancel.)
Click on the File Menu in the top left and Choose New Screen Recording.

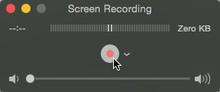
Make sure what you want to record on your screen is open and ready to share and then come back to QuickTime and press the Record button and begin!

Once you are done recording, just press the Stop button in the top right edge of your screen.

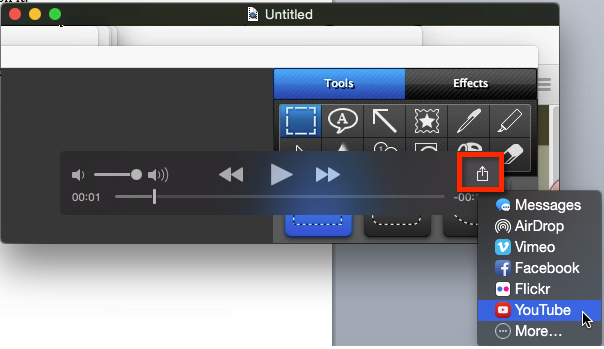
QuickTime gives you an immediate preview of what was recorded and then you can choose either Save or Export to store your video on your computer or press the Share button in the QuickTime preview window to send it to others via your choice of several options:
QuickTime also allows you to choose a different microphone if desired as well as lets you record the whole screen or just a part of it just prior to beginning your recording.
It’s that easy!
TIP: to Keep the QuickTime icon in your dock, while QuickTime is open, find it’s icon in the dock, right-click (on a laptop, two-finger click or click and hold) then choose options and then “Keep in Dock.”
- Blog entry written by CTL's Instructional Designer Greg Asman -