- About Discussion Tool
- How do I create forums and topics?
- How do I use release conditions?
- How do Students Participate in a Discussion?
- Can I grade student discussions?
- What if I want a discussion board available for a specific group of students?
- How can I see the statistics for a discussion topic?
- Can I export all discussion posts for a topic?
About Discussion Tool
The Discussions tool is a collaboration area to post, read and reply to threads on different topics, share thoughts about course materials, ask questions, share files, or work with your peers on assignments and homework.
How do I create forums and topics?
In Pilot, every discussion must have at least two parts: a Forum and a Topic. The forum is like a folder. The topic is what goes inside the forum. Topics are where discussions take place. If you do not have topics, you won’t have discussions.
Create a Forum
-
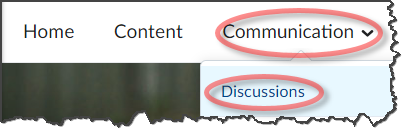
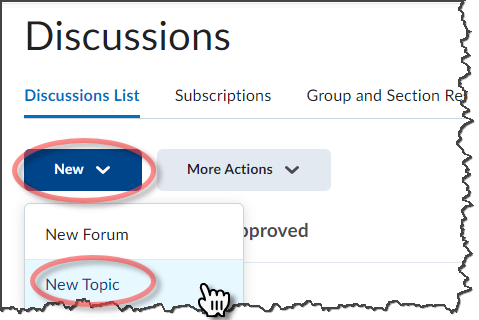
To get started, click “Communication” on your course navigation bar, then click “Discussions.”
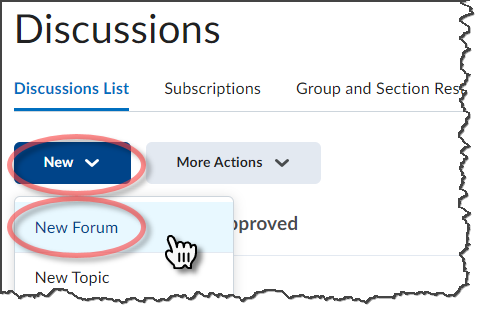
Click the blue “New” button and choose “New Forum.”
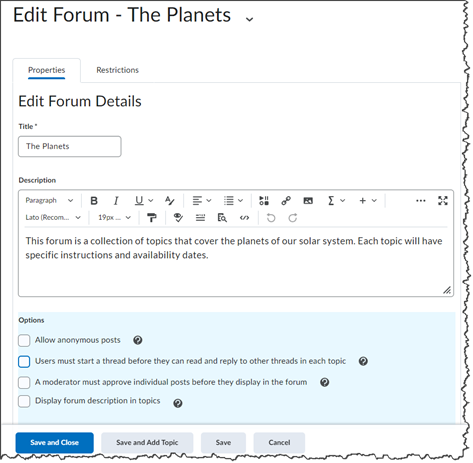
On the “Edit Forum” Properties page, fill in a Title for your forum. A description is optional but can be a good place to describe the topics within it. Save when completed.
NOTE: We recommend that you NOT add any options or restrictions at the forum level and apply them to the topics within.
Create a Topic
A forum is useless without a topic. Topics in Pilot are where discussions take place and each topic must be in a forum. You can put as many topics in a forum as you like.
-
To get started, click “Communication” on your course navigation bar, then click “Discussions.”

-
Click the blue “New” button and choose “New Topic.”
-
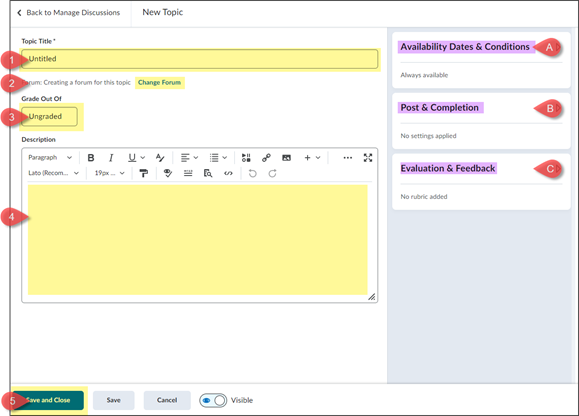
On the New Topic edit page,
- the Topic Title is the only required field.
- Use the Change Forum link to attach the topic to a forum.
- Click into the Grade Out Of field to attach the topic to the gradebook.
- Use the HTML editor in the Description to enter instructions.
- Save your topic.
(See image below under 'Other Options')
Other Options
- Availability Dates & Conditions:
- Availability lets you set a period during which students can see the forum. Outside that range, the forum disappears to them. You will still see it, but your students won’t. You can also hide the forum and make it visible manually. You don’t have to choose a date range.
- Availability Options (formerly called Locking Options) are visibility settings used to determine if a student sees the topic before or after the availability dates.
- Release Conditions are a kind of “gatekeeper.” They are used to hold access to future content from the learner until current content meets a specific condition. For example:
- Specific content has been accessed or completed
- A specific score achieved, or
- A learner fits into a specific group or section
- Post & Conditions: Allows the instructor to set a few posting requirements.
- Evaluation & Feedback: Add a Rubric, attach learning objectives, and add evaluation options.
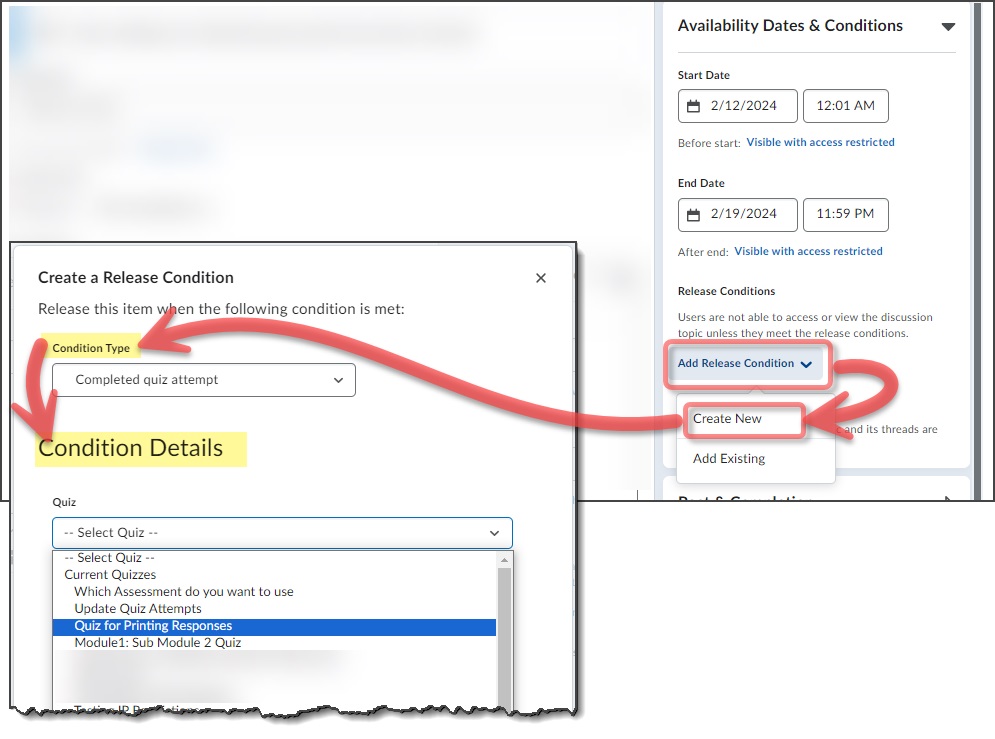
How do I use Release Conditions?
Release Conditions hold content (discussions, quizzes, or other module content) from the learner's view until the specific condition is met. To do this you set up the condition type and select the condition details. You can have more than one.
-
While in the topic Edit mode, under Availability Date and Conditions, click Add Release Condition. You can select from a list of existing pre-set conditions or create your own. If you create your own, you will select the condition type and the condition details. Be sure to click the Create button at the bottom.
-
Once added, the details show near the Release Conditions button.
How do Students Participate in a Discussion?
Create a thread in Discussions
Click on the topic where you want to post and click Start a New Thread. Enter a Subject and type your post. After you've typed your post, you can also select the following options:
- Select Post as Anonymous to post anonymously (this is only available if the discussion board settings allow anonymous posts)
- Select Subscribe to this thread to receive updates on the thread via your selected notification method.
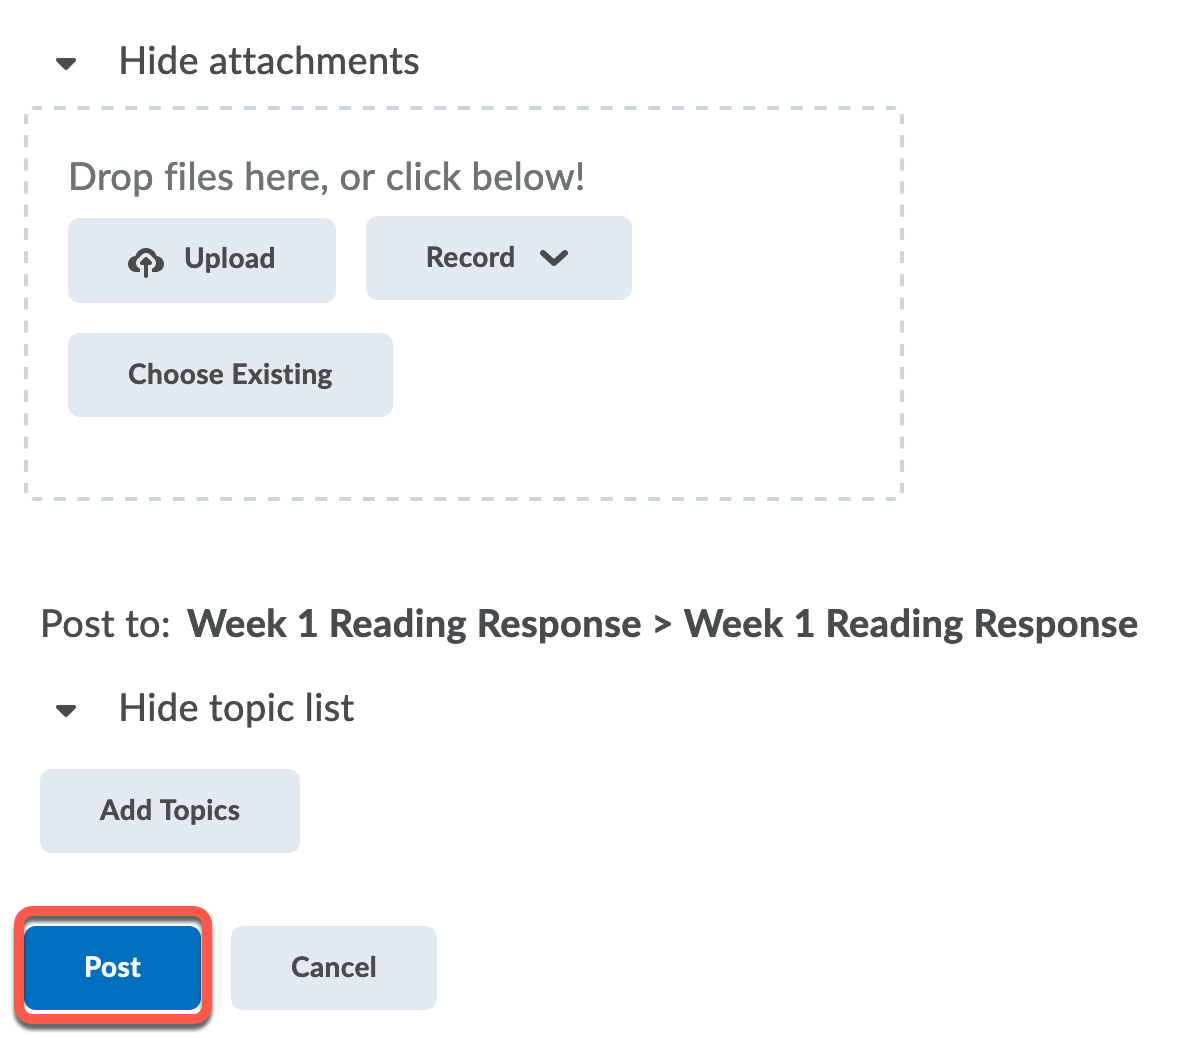
Pilot provides options to Add attachments from your computer files or record a response. The discussion tool also allows you to post to several topics at once. To post to other topics, click Post to Other Topics and then Add Topics. Here, you'll select the topics you would like your thread to appear in. To post in every topic simultaneously, select the Select All check box, then click Add Topics. When you're finished, click Post.
If the topic is moderated, your post will not appear until a moderator approves it. Moderated topics will display Moderated beside the topic name in Discussions List. Inside the topic, all threads track how many Unapproved replies each thread contains. Inside the thread, any posts requiring approval display Approve Post in the subject header.
Reply to a thread in Discussions
Locate the thread you want to reply to and click on the title of the post. Select the blue button labeled Reply to Thread.

Enter your reply in the HTML Editor. To include the original post’s text in your reply, click the Add original post text link. Set any other options you want including:
- Select Post as Anonymous to post anonymously.
- Select Subscribe to this thread to receive updates to the thread via your selected notification method.
- Select Add attachments and click on Upload or Choose Existing to locate the file(s) you want to attach, or, if you are using a supported browser, drag and drop your files onto the attachments upload target. You can attach as many files as you want or record a response. When finished, click Post.
Can I grade student discussions?
Yes. You can grade the submissions manually or with a rubric. Here is how to manually grade a discussion post.
Navigate to Communications, and find the topic to be graded. Click the action arrow next to the topic and select Assess Topic.
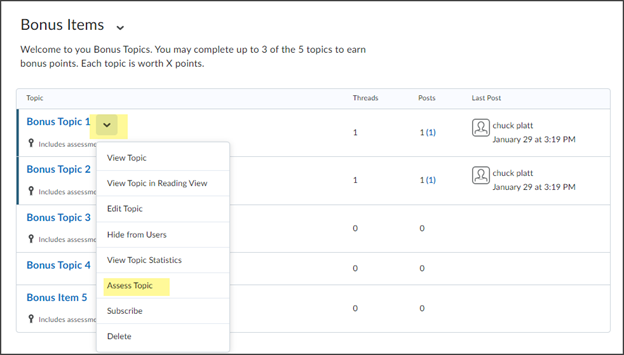
Scroll to the Topic Score to be assessed and click it.
To evaluate:
- Review the submission
- Provide an overall score
- Provide feedback
- Save or Update
- Navigate to the next submission
Grade with a Rubric
Click this link to learn more about creating, adding, and grading with a rubric. Click Here
What if I want a discussion board available for a specific group of students?
Currently, these types of restrictions must be set at the Forum level.
- Navigate to Communications to find the Forum to be restricted, click the action arrow next to it, and select Edit Forum.
- Click the Restrictions Tab and scroll to Group and Section Restrictions.
- Select the option to restrict and click the active Add Group and Sections button
- In the pop-up select the group or section category and the specific group or section and save.
- Then Save and Close on the main Edit Forum page.
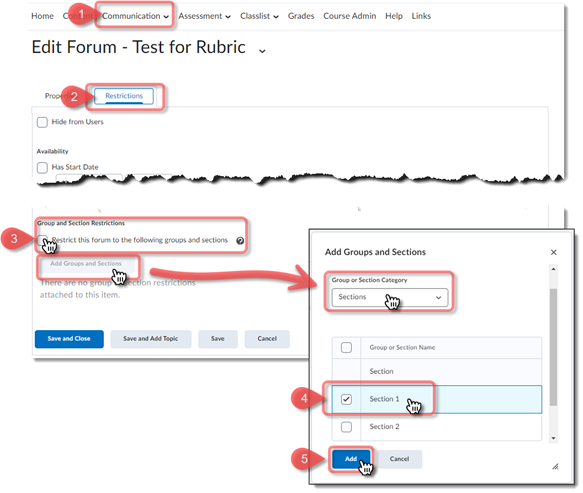
To reopen it for all learners, simply navigate to the Groups and Sections Restrictions and clear the selection.
How can I see the statistics for a discussion topic?
To review statistics for discussions based on users, groups, or topics, go to your Discussion List and click on the Statistics tab.
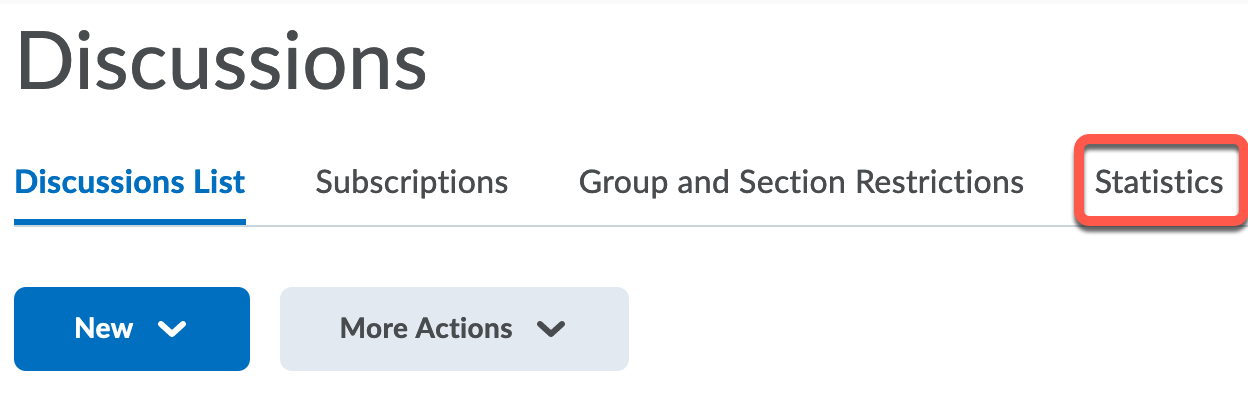
From this page, you can view the number of posts a student has written, replied to, and read. You can also filter the stats by groups or by the forums and topics. To print, click on the gray button labeled "Export to CSV File" in the upper left corner of the page.
Can I export all discussion posts for a topic?
Exporting All Posts in a Topic
Follow the procedure below for each Discussion topic from which you want the posts exported.
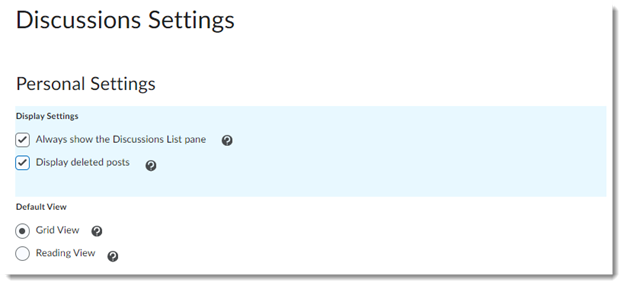
Go to the Discussions tool. Click on Settings near the upper-right corner

Select Grid View under “Personal Settings” if not already set.
Next, select a topic within a forum and change the view to “All Posts” (press the Apply button).
Change the number of posts viewed at a time to the highest possible option; typically, this is 50. If there are more posts than the number viewed at a time, you will have to repeat this procedure for each page to include all posts.
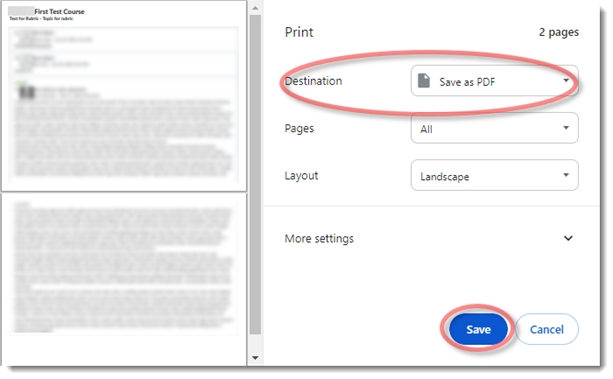
Select the ‘Select all rows’ box just above the message headings and select the “Print” icon.
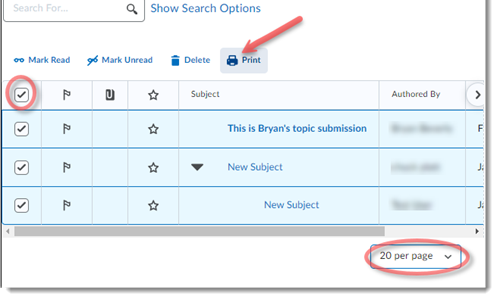
This brings up a scrolling “printable view” window containing the posts. Click Print. In the pop-up Destination field, select “Save as PDF,” and Save. From there, select the file destination.