- About Panopto
- How do I add Panopto to my Pilot course?
- What are the steps to record a lecture with Panopto for Windows?
- What are the steps to record a lecture with Panopto for Mac?
- How do I get a past course's videos into the current semester folder?
- How do I upload a video file into Panopto?
- Why can't my students upload their video assignments to Panopto?
- Why can't I get my video inserted using Insert Stuff?
- When my students try to watch the video, it just re-loads the Pilot homepage. Why?
- How do I use the advanced Panopto features, like editing and adding quizzes?
- How do I log-in to the Panopto application?
About Panopto
Panopto is a self-service solution integrated into Pilot, offering video streaming playback directly in a web browser.
Panopto can be used and configured in a variety of ways to meet your instructional needs. Features include: multiple publishing options, detailed analytics, video editing, variable-speed playback, and student media upload capabilities. Panopto also offers lecture capture from multiple video or computer screen sources.
Of the many ways faculty use Panopto, by far the most common is to record a video of a PowerPoint presentation with narration. Panopto uploads the video to the correct course where only students in that course can see it. Faculty may choose to allow students to record, too.
Panopto Features
- Record in the office, at home, or in class.
- Record everything you do on screen, not just PowerPoint.
- Record video of the instructor synchronized with the screen capture.
- When using PowerPoint, Panopto captures text to make videos searchable.
- Add notes, links, and documents to the video.
- Share recordings from course to course.
- Students may view recordings on a computer or through a Panopto app for iOS or Android devices.
- The mobile app may also be used to record and upload video.
To get started with Panopto at Wright State, see our Panopto Tutorials page.
How do I add Panopto to my Pilot course?
Adding the Panopto external learning tool to your Pilot course Content will allow you to upload, manage, and share audio and video files securely with your students. You can also download and install Panopto’s own recording software (Windows/Mac) for free after adding the the external learning tool. Detailed instructions on the installation and use of both Panopto for Windows and Panopto for Mac, as well as other Panopto features, can be found on the Panopto Tutorials page.
This tool needs to be added to the Pilot course to begin each semester. If you are copying course components over in Pilot from an old course, to which the tool has already been added, it does not need to be re-added, but you will need to go into the old course’s Panopto folder and move the previous video files into the new semester’s Panopto folder.
Navigate to your Pilot course, click Content from the course navigation bar, and either select an existing module from the Table of Contents or create a new module by clicking into the “Add a module” text box, giving it a title, and pressing return/enter on the keyboard.
In the selected module (I’ve named mine "Video Recordings" in the example), press the “Add Existing Activities” menu button and choose “External Learning Tools” from the sub-menu.

Scroll down through the alphabetical list of external learning tools and click “Panopto.”

Congratulations! You’ve added Panopto to your course and you’ve given your videos a place to live.
The Panopto external learning tool acts as a central portal from which you can:
- Launch Panopto’s lecture/video recording software (Create > Panopto for Windows or Create > Panopto for Mac)
- Upload and share local video and audio files from your computer, tablet, or smartphone (Create > Upload)
- Create an Assignment folder to which students can upload videos securely
This can also be the central point where your students access all of your videos as they are created and uploaded. If you would prefer to share the individual videos in different modules in Pilot Content, you can hide the Panopto external learning tool’s module by setting it to “draft,” then copying the links from each individual video from there and placing them in their appropriate modules (New > Create Link).
What are the steps to record a lecture with Panopto for Windows?
Required Equipment: Windows computer with a microphone.
We recommend using a laptop if you have one available because the microphone is built into the laptop. A desktop computer will also work if you have an external microphone or headset. The Panopto for Windows recording software works for Windows 7 and up.
If you do not have a laptop or a microphone/headset for your desktop computer, the CaTS Help Desk also has a limited supply of microphones available for checkout as well.
Add Panopto to your Pilot course (Note - this link will take you to instructions on Brightspace's external website, which is another name for Pilot).
Your lecture videos will need a place to live in your Pilot course, so the first thing you’ll need to do is add it to your Pilot course section. Students will also access recorded videos from this Panopto link as well.
Install the free Panopto for Windows recording software onto your computer.
Once you have added the Panopto tool to Pilot, click the green Create button and choose to "Panopto for Windows" from the dropdown menu. It will ask if you want to Launch Panopto or Download. Choose to Download and install the software, following along to the default prompts.
How to use the Panopto for Windows recording software.
Once the application is installed, you will navigate back to the Panopto tool in Pilot, click the green Create button again and select "Panopto for Windows." Choose to "Launch Panopto" or "Open Panopto" (different computers/browsers will have different language). After you press the launch/open link, you may also see browser prompts asking for confirmation to open the software - agree to those prompts to launch the software.
For more details on recording in Windows, please download and view the quickstart instructions in this 6-page PDF file or visit the more thorough documentation on Panopto's website.
What are the steps to record a lecture with Panopto for Mac?
Required Equipment: MacOS computer with a microphone.
We recommend using a Macbook or an iMac if you have one available because the microphone is built into the computer. An external microphone or USB headset will also work for recording your voice. The Panopto for Mac recording software works for MacOS 10.11 and up.
If you do not have a laptop or a microphone/headset for your desktop computer, the CaTS Help Desk also has a limited supply of microphones available for checkout as well.
Add Panopto to your Pilot course (Note - this will take you to Brightspace's external website, which is another name for Pilot).
Your lecture videos will need a place to live in your Pilot course, so the first thing you’ll need to do is add it to your Pilot course section. Students will also access recorded videos from this Panopto link as well.
Install the free Panopto for Mac recording software onto your computer.
Once you have added the Panopto tool to Pilot, click the green Create button and choose to "Panopto for Mac" from the dropdown menu. It will ask if you want to Launch Panopto or Download. Choose to Download and install the software, following along to the default prompts.
How to use the Panopto for Mac recording software.
Once the application is installed, you will navigate back to the Panopto tool in Pilot, click the green Create button again and select "Panopto for Mac." Choose to "Launch Panopto" or "Open Panopto" (different computers/browsers will have different language). After you press the launch/open link, you may also see browser prompts asking for confirmation to open the software - agree to those prompts to launch the software.
For more details on recording in Mac, please download and view the quickstart instructions in this 6-page PDF file or visit the more thorough documentation on Panopto's website.
How do I get a past course's videos into the current semester folder?
How do I upload a video file into Panopto?
Please visit Panopto's tutorial page for uploading content.
Why can't my students upload their video assignments to Panopto?
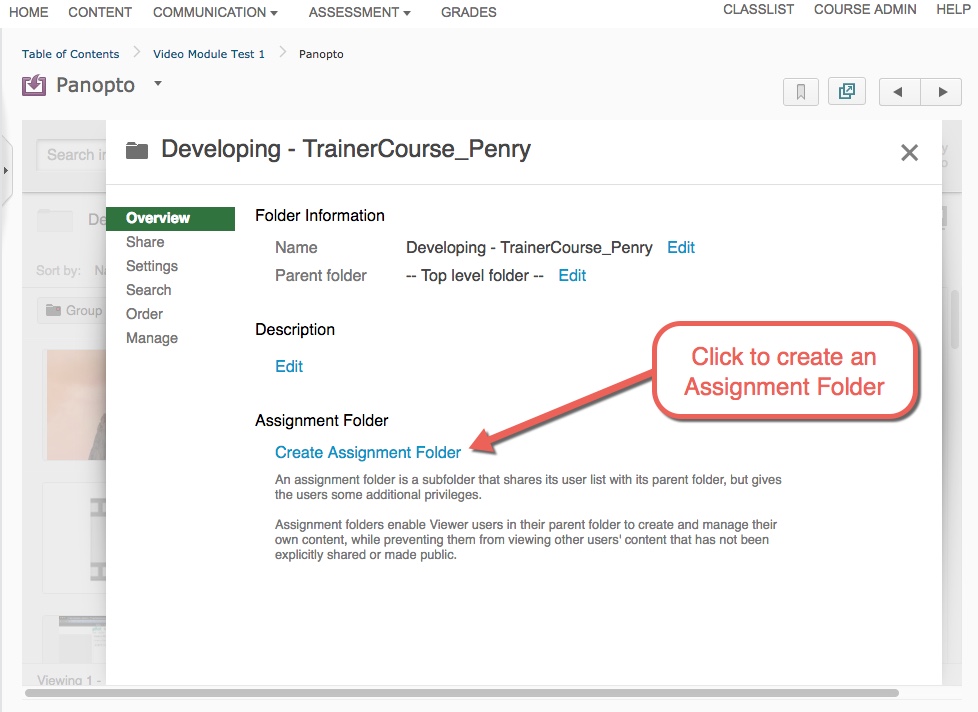
By default, Panopto only allows faculty to upload videos to their course for streaming in Pilot. If you assign video projects to students and would like them to upload to Panopto, you may create an Assignment Folder.
To do so, launch Panopto in Pilot and click the gear icon to display the course Folder Settings (as seen in the image below).
From the Folder Settings Overview, you can click the "Create Assignment Folder" link to create a folder where students can submit videos (as seen in the image below).
By default, the Assignment Folder privacy settings allow the faculty member to see all submitted videos and the student to only see his or her uploaded video. For example, if your class has 20 students, the instructor will see 20 videos in the folder, but the individual student will see his or her one video submission only. These settings can be changed in the Folder Settings of the Assignment Folder if you would like for students to see video submissions from the entire class.
There can only be one Assignment Folder within a Panopto folder. If you wanted multiple Assignment Folders (e.g., Week 1 Assignment Folder, Week 2 Assignment Folder, etc.), this can be done by creating general sub-folders (e.g., Week 1 folder, Week 2 folder, etc.) and creating an Assignment Folder within each of those general sub-folders.
Student Tutorial Documents
- Panopto for Windows recording software instructions (PDF)
- Panopto for Mac recording software instructions (PDF)
Why can't I get my video inserted using Insert Stuff?
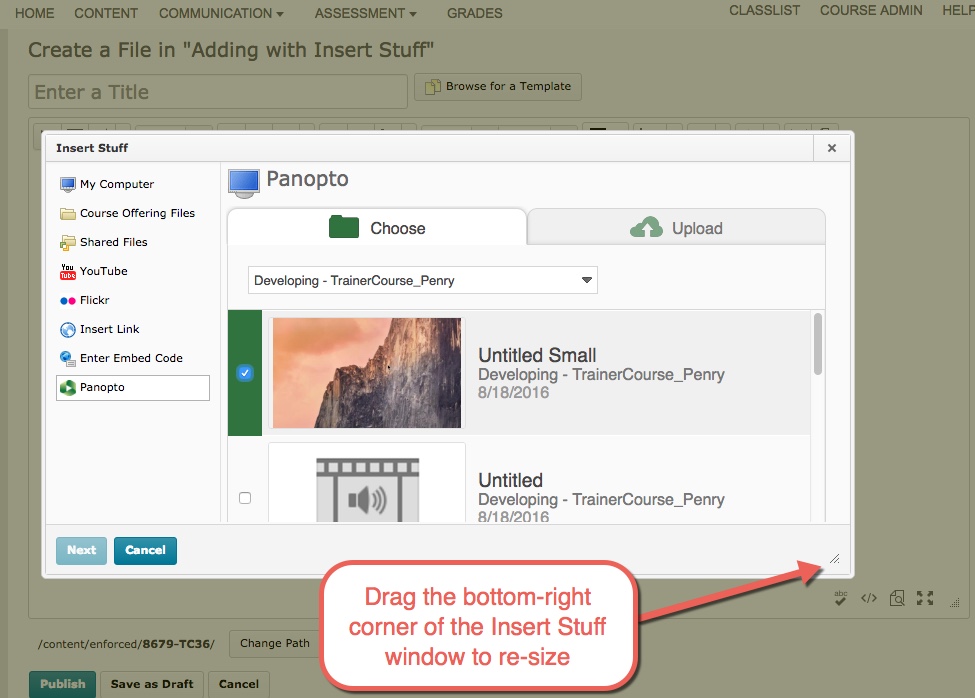
If the resolution on your computer monitor or device is small, you may not see the green Insert button when trying to embed a Panopto video using the Insert Stuff tool. This issue is known and is actively being addressed.
If you select the video to embed and the green "Insert" button is missing (as seen in the image below), you can simply resize the Insert Stuff window by dragging the bottom right corner.
Expanding the window any amount will fix the error and properly display the green "Insert" button (as seen in the image below).

When my students try to watch the video, it just re-loads the Pilot homepage. Why?
If a student tries to play a Panopto video in Pilot and the video frame displays the Pilot homepage instead of the video, the student probably has a Safari security feature enabled. Switching to Chrome or Firefox should work for all videos in Pilot, but the Safari security setting can also be disabled easily.
Click "Safari" from the top menu bar and choose "Preferences" from the dropdown submenu (step 1). In the Preferences menu, select the "Privacy" tab (step 2), and un-check "Prevent cross-site tracking" (step 3). You may need to close it and refresh the browser, but the videos should visible with the updated Safari setting.

How do I use the advanced Panopto features, like editing and adding quizzes?
How do I log-in to the Panopto application?
As of August 2018, users have not been able to log-in directly to Panopto applications with their Pilot log-in credentials. Panopto applications include the Panopto mobile app (iOS and Android) and the Panopto Recorder for Windows and Mac.
To use these applications, you must first log-in to Pilot from a web browser and launch the application from Pilot.
Panopto Recorder instructions:
To use the Panopto Recorder for Windows or Mac, you must first log-in to Pilot from a web browser on your computer. Navigate to the appropriate Pilot course that has either the Panopto widget on the course home page or the Panopto external learning tool in course Content. Click the Panopto widget or external learning tool and you will see the large green “Create” button. Click the green Create button and select “Record a New Session,” as shown in the image below.

Depending on your browser, you may see one or two prompts asking you to confirm that you want to open the Panopto Recorder. Click “Open” on each of these prompts until the Panopto Recorder opens for you. Your Pilot credentials will successfully pass over and launch the Panopto Recorder application.