Rubrics
- What are Rubrics? When do I use them?
- How do I create and grade a Holistic Rubric?
- How do I create and grade an Analytic Rubric?
- How do I attach rubrics to grades and activities?
- How are rubrics used in Grades vs Discussions?
What are Rubrics? When do I use them?
A rubric is a matrix that defines what students need to do to fulfill different levels of achievement for an activity. Rubrics make your expectations clear and help you grade more quickly. Also, students learn from rubrics and use them for peer reviews.
Rubrics become most useful when you attach them to activities, such as Grade items, Dropbox folders, and Discussion topics.
This page gives an overview of Pilot’s Rubrics tool and explains the differences between holistic and analytic rubrics.
List of Videos in Playlist
To see individual videos in this playlist,
- click the icon in the top left corner of the video or…
- go to the YouTube Playlist page for Rubrics.
When to Use Rubrics
In addition to showing students the criteria you use to assess assignments, Rubrics can guide student peer reviews. Here are a couple examples:
- You want to assess students’ performance based on four criteria: Knowledge and Understanding, Critical Thinking, Communication, and Application of Knowledge. Students may achieve one of four levels for each criteria: Needs Remediation, Below Expectations, Meets Expectations, and Exceeds Expectations. The rubric describes what mastery students must demonstrate to achieve each level of each criterion.
- You want to encourage your course participants to review and comment on each others’ work on an assignment. You create a rubric that allows course participants to evaluate the overall quality of the assignment using the following achievement levels: This Needs Work, Good Start, Nice Example, and Showcase Worthy.
Two Types of Rubrics
When you create a rubric in Pilot, you must choose which type you want. You won’t be able to change its type later. So you’ll want to understand the difference between these two types before you begin.
- A holistic rubric uses one set of levels to assess the whole activity.
- An analytic rubric breaks the assessment into multiple criteria so you can assess each aspect of the activity.
There are also some differences in how levels are scored. Faculty most often choose analytic rubrics because they offer more detailed assessments.
Holistic Rubric
Holistic rubrics assess a student’s overall achievement on an activity, based on predefined achievement levels. They do not break the scoring down into multiple criteria. Holistic rubrics may use percentages or text-only scoring.
Example Holistic Rubric, 4 Levels
| Level | Description |
|---|---|
| Level 4 85% or more |
The photographer has submitted three sharp, well-composed, high quality photographs that capture the character of the event and place exceptionally well. The photos get in close, show faces and catch honest emotions. |
| Level 3 75% or more |
The photographer adequately met requirements specific to this assignment. |
| Level 2 65% or more |
The requirements were partly met. But the photographer missed some major part of what the assignment is about. |
| Level 1 0% or more |
The photographer has some photos. But they significantly fail to meet the full assignment. The photos may be unrelated to the current assignment or of very poor quality. |
See Create and Grade a Holistic Rubric
Analytic Rubric
Analytic rubrics have multiple criteria. You assess the level of achievement for each. You may give different weight to each criterion by assigning different values.
Analytic rubrics may use points, custom points, or text-only scoring. Rubrics that use points or custom points may use both text and points to assess performance. With custom points, each criterion may be worth a different number of points. For both points and custom points, Pilot will provide an overall score based on the total number of points achieved.
Example Analytic Rubric with 3 Criteria, 4 Levels, Custom Points
| Criteria | Well Done | Sufficient | Needs Improvement | Low/No Evidence |
|---|---|---|---|---|
| Coverage, Visual Variety | 20 points
The photographer did an exceptional job, trying several solutions to the assignment, exploring each solution in-depth with different angles, distances, composition, etc. When appropriate, photos include overall, medium, and close-up shots. |
17 points
The photographer made an adequate effort to get the required number of photographs and try some variations on each idea. |
14 points
The photographer made a minimal effort to get visual variety. A few examples follow: The photographer got fewer than the required number of photos. Some photos are not on topic. Photos seem to have been taken just to pad the count. It’s unclear what the photographer was trying to capture. |
10 points
Examples: The photographer got far fewer photos than required. Each photo is a completely different subject. There is little or no evidence of having worked an idea. |
| Composition: Simplified, Organized, Emphasized, Balanced and Well Lighted | 15 points
The photographer did an exceptional job of visually tying together all the elements in the picture to support and empasize the subject. Extraneous details are eliminated and the picture feels appropriately balanced. |
12 points
The photographer did an adequate job of visually tying together all the elements in the picture to support and empasize the subject. Extraneous details are mostly eliminated and the picture feels appropriately balanced. |
11 points
The photographer needed to find a different angle, distance or technique to eliminate extraneous details, organize the elements, emphasize the subject or get good lighting. Perhaps one must guess at what the photographer intended. |
9 points
The photo is unorganized and cluttered with extraneous details. The subject gets lost. The lighting obscures and detracts from the subject. |
| Post Processing, Image Quality | 10 points
Post processing is exceptionally well handled in Photoshop. It is artfully cropped. Color balance, exposure and contrast bring out the best in the picture. Distracting areas have been tastefully darkened or lightened to enhance the subject. |
8.5 points
Post processing has been moderately well handled. Minor adjustments would make a significance difference in the image quality. |
7.5 points
Cropping, and other adjustments still need some major work. |
6.5 points
Post processing was clearly needed but neglected. |
| Overall Score | Level 4 38 or more |
Level 3 33 or more |
Level 2 26 or more |
Level 1 0 or more |
See Create and Grade an Analytic Rubric
Where to Use Rubrics
Once you have created a rubric, you will need to attach it to an activity in Pilot so students will see it and you can use it to assess assignments.
When you assess an activity with a rubric attached to a grade item, the rubric will pass each student’s score directly to that grade item. Unfortunately, rubrics don’t connect directly to Grades when they are attached to other tools. Even so a rubric may be easiest to use when you place it within the tool where your assignment takes place.
See Attach Rubrics to Grades and Activities
How do I create and grade a Holistic Rubric?
Holistic rubrics let you assess an activity as a whole. If you want to be able to assess individual parts of an activity, you will need to use an analytic rubric instead.
This page will walk you through how to make and use holistic rubrics.
Create a Holistic Rubric
Click or hover over “Assessment” on the course navigation bar and click “Rubrics.”
Click the blue “New Rubric” button.
On the “Edit Rubric” page, leave the “Rubric Status” set to “Draft” until you have the rubric ready to use. But you will need to change the status to “Publish” before you can associate the rubric with a tool, such as a Grade item.
Leave the “Rubric Type” on “Holistic,” of course. You won’t be able to change this once you save the rubric.
Type in the “Initial # of Levels” you want. Four or five is common. The more levels you have, the more precisely you can score an activity. But more levels makes it more difficult to write descriptions that clearly distinguish one level from the next.
If you want Pilot to assign a percentage score based on the level you choose when you assess an assignment, leave the “Scoring Method” on “Percentages.” If you don’t need the rubric to pass a percentage grade to a grade item, you may prefer to choose “Text Only.” The text option lets you label your levels with terms like Exceptional, Average, Unacceptable, or with traditional letter grades.
Save your choices.
Edit Levels, Start Range, Description, Feedback
Click the “Levels” tab at the top of the page
Click “Edit Levels” to name your levels, write a description explaining the requirements for each level, and include the feedback a student will get when you choose a level.
If you chose “Percentages” for your “Scoring Method,” there will be also be “Start Range” numbers. These represent the threshold for each level. That is, each number is the lowest score a student can get and achieve that level.
Once you have everything filled in, click “Save.”
To see how your rubric looks, click the little downward-pointing arrow to the right of the rubric’s name near the top of the page. Then choose “Preview.”
Grade with a Holistic Rubric
To use a rubric to assess students’ work and provide feedback, attach it to an activity, such as a Grade item, Dropbox folder, or Discussion topic.
Student View of Original Rubric
Although you can’t use a rubric to assess anything until you assign it to an activity, students can see any rubric that’s status is “Published,” whether the rubric is attached to anything or not:
Under “Assessment” on the navbar, click “Rubrics.”
On the “Rubrics” page, click the little arrow to the right of the rubric’s name, then click “Preview.”
Students will see the rubric in that preview, but not any grading you have done with the rubric.
Grade with Holistic Rubric Attached to a Grade Item
When you attach a rubric to an item in Grades, the rubric can automatically fill the grade item with its score. Then you don’t have to copy each student’s score to Grades.
Once a holistic rubric is attached to a grade item, it’s easy to score:
Click “Grades” on the navbar.
What you do next depends on which view you are in:
If you are in “Manage Grades,” click the small arrow next to the name of the item you want to grade, then choose “Enter Grades.”
If you are in “Enter Grades,” click the small arrow next to the name of the item you want to grade, then choose “Grade All.”
For each student, click the yellow rubric icon in the “Assessment” column.

On the rubric, click the level you want to assign. You can also click in the “Feedback” box to change the feedback you want to give the student.
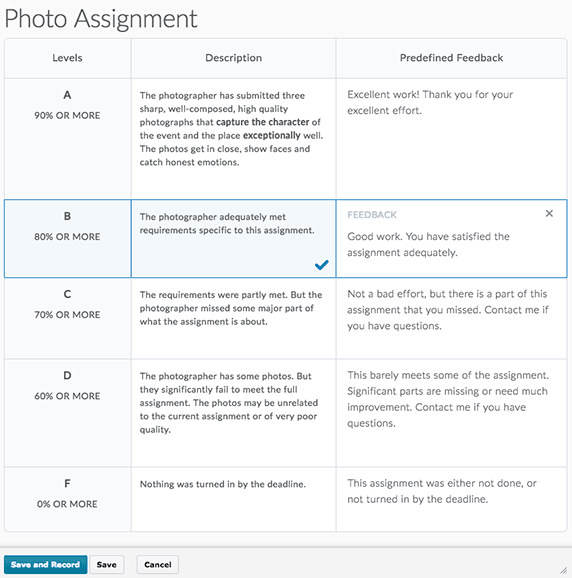
Click “Save and Record.” Pilot will close the rubric and fill the grade item with the number of points that corresponds to the percentage you entered for the start range of that level. You can fine tune the score in the grade item.

On the Grade Item page, click “Save” after you grade each student and “Save and Close” when you are done grading.
Student View of Graded Rubric
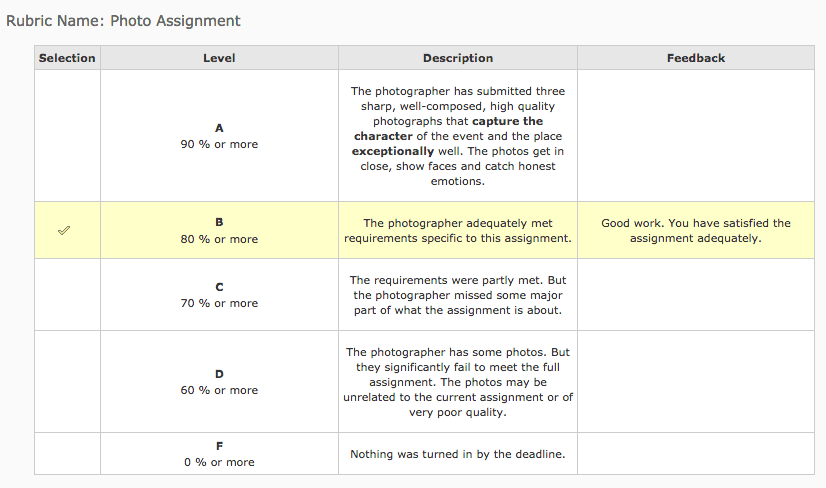
When you grade with a rubric that’s attached to a grade item, a student will see an “Assessment Details” link to the right of the grade item in “Grades.”
![]()
A student who clicks “Assessment Details” will see the rubric. The level you assigned will be highlighted in yellow. Only the feedback for that level will be visible.
How do I create and grade an Analytic Rubric?
Analytic rubrics have multiple criteria. You assess the level of achievement for each. You may give different weight to each criterion by assigning different values.
This page will walk you through how to make and grade an analytic rubric.
Related Pages
- Rubrics: What They Are, When to Use Them
- Rubrics: Create and Grade a Holistic Rubric
- Rubrics: Attach Rubrics to Grades and Activities
Create an Analytic Rubric
Click or hover over “Assessment” on the course navigation bar and click “Rubrics.”
Click the blue “New Rubric” button.
On the “Edit Rubric” page, leave the “Rubric Status” set to “Draft” until you have the rubric ready to use. But you will need to change the status to “Publish” before you can associate the rubric with a tool, such as a Grade item.
For “Rubric Type,” choose “Analytic,” of course. You won’t be able to change this once you save the rubric.
Change the “Initial # of Levels” and the “Initial # of Criteria” to what you want. The more levels you have, the more precisely you can score an activity. But more levels makes it more difficult to write descriptions that clearly distinguish one level from the next.
For “Scoring Method,” you have three choices:
- “Points” lets you assign a score to each level of achievement. The levels have the same number of points for each criterion, so all criteria have the same weight. Pilot will calculate the total points from all criteria.
- “Custom Points” lets you assign a score to each level of achievement within each criterion. This lets you control how much weight each criterion has in the final score. Pilot will calculate the total points for all criteria.
- “Text Only” lets you assess criteria with words like Exceptional, Average, Unacceptable, or with traditional letter grades. Since there are no numerical values, Pilot cannot calculate a total.
Save your choices.
Edit an Analytic Rubric
Click the “Levels and Criteria” tab at the top of the page
The key to editing the rubric is in the little downward-point arrows next to the table headings.
For example, click the small arrow to the right of the table heading “Criteria” and choose “Edit Criteria Group” to name your criteria and levels.
Click the small arrow to the right of each criterion and choose “Edit Criterion” to name the criterion, set the numeric value of each level, write a description explaining the requirements for each level, and include the feedback a student will get when you choose a level.
Once you have everything filled in, click “Save.”
To see how your rubric looks, click the little downward-pointing arrow to the right of the rubric’s name near the top of the page. Then choose “Preview.”
Grade with an Analytic Rubric
To use a rubric to assess students’ work and provide feedback, attach it to an activity, such as a Grade item, Dropbox folder, or Discussion topic.
Student View of Original Rubric
Although you can’t use a rubric to assess anything until you assign it to an activity, students can see any rubric after you’ve changed its status to “Published,” whether the rubric is attached to anything or not.
Under “Assessment” on the navbar, click “Rubrics.”
On the “Rubrics” page, click the little arrow to the right of the rubric’s name, then click “Preview.”
Students will see the rubric in that preview, but not any grading you have done with the rubric.
Grade with Analytic Rubric Attached to a Grade Item
When you attach a rubric to an item in Grades, the rubric can automatically fill the grade item with its score. Then you don’t have to copy each student’s score to Grades.
Once a holistic rubric is attached to a grade item, it’s easy to score:
Click “Grades” on the navbar.
What you do next depends on which view you are in:
If you are in “Manage Grades,” click the small arrow next to the name of the item you want to grade, then choose “Enter Grades.”
If you are in “Enter Grades,” click the small arrow next to the name of the item you want to grade, then choose “Grade All.”
For each student, click the yellow rubric icon in the “Assessment” column.
On the rubric, click the level you want to assign. You can also click in the “Feedback” box to change the feedback you want to give the student.
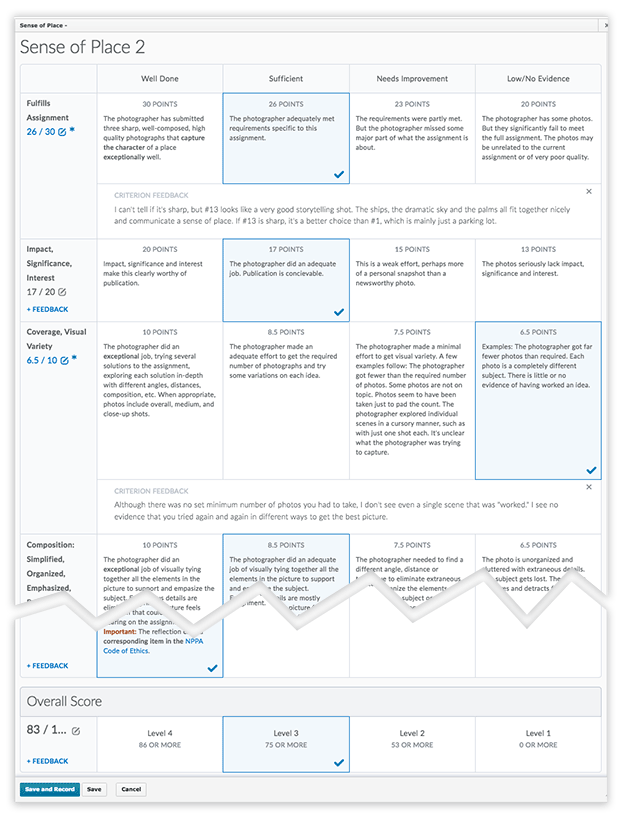
The first column of the rubric contains your criteria. Each criterion’s cell lets you fine tune the score for that criterion. Use the “Feedback” link to write explanation, advice, encouragement, etc. for that criterion. Each criterion is followed in its row by its levels, including a description of each level and its point value. The level’s feedback follow the row of descriptions. The last row shows the total points, the threshold for each level, and the level achieved.
Student View of Graded Rubric
When you grade with a rubric that’s attached to a grade item, a student will see an “Assessment Details” link to the right of the grade item in “Grades.”
![]()
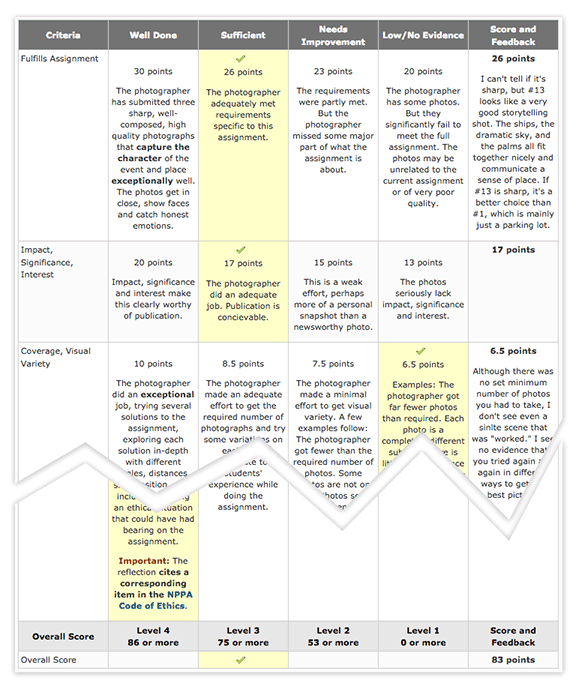
A student who clicks “Assessment Details” will see the rubric. The level you assigned will be highlighted in yellow with a green check mark. The feedback and score for each criterion will be in the last column of its row. The level earned and total score will be in the last row of the table.
How do I attach rubrics to grades and activities?
This page shows you how to attach rubrics to activities and helps you decide where to place your rubrics.
What it Means to Attach a Rubric
A rubric can help you quickly and precisely grade an assignment, but only if you first attach it to another Pilot tool, such as a grade item or dropbox folder.
The table you create in the “Rubrics” tool is like a template. When you attach the rubric to a grade item, for example, it’s like making a copy of the rubric that you can use in “Grades.” The copy is no longer connected to the template in the Rubrics tool.
That means you can use one rubric on multiple assignments and in multiple places. It also means that copies of a rubric don’t talk to each other. So even if you attach the same rubric to both a dropbox folder and a grade item, the markup you do in the dropbox folder won’t carry through to the rubric in Grades. Students will have to view the copy that’s in the dropbox to see which cells you selected.
The table below summarizes the pros and cons of attaching a rubric to the three tools where people most commonly attach rubrics: a grade item, a dropbox folder, and a discussion topic.
| Tool | Description |
|---|---|
| Grade Item | The professor grades the assignment in “Grades.” Pilot calculates the score and pushes it to the grade item. Students see the score and feedback in Grades, and can click a link in Grades to open the rubric and see how the professor scored it. |
| Dropbox Folder | Students see an ungraded version of the rubric when they enter the dropbox. So they have a way to check that they’ve satisfied requirements before they upload files.
Faculty may grade in the dropbox. In that case, the score and feedback from the rubric becomes is pushed into the folder for the assignment. In turn, the score and feedback are pushed to a grade item, if one is attached to the folder. Students will see the score and feedback in Grades, but will have to go to the dropbox to see the scored rubric. |
| Discussion Topic | If you want to use a rubric to grade a discussion topic, it’s usually best to attach the rubric to a Grade item and do the grading in the Grades tool.
Students can click an icon in the discussion topic to see an ungraded rubric, like they would see in a dropbox folder. Faculty can use that rubric to calculate a grade within the discussion topic. However, the score goes nowhere. You must manually transfer it to Grades. Students can’t see the graded rubric from within the discussion topic, which is why it’s usually best to grade with a rubric that’s attached to a grade item. |
Attach a Rubric to a Grade Item
A rubric attached to a grade item shows up in Grades, where students are used to looking for assessment results. When a rubric is attached to some other tool, students may be less likely to see the grading you did with the rubric.
To attach a rubric to a grade item…
Click “Grades” on the navbar.
In “Manage Grades,” click the name of the grade item with which you want to use the rubric. That will take you to the “Properties” tab for that grade item.
Scroll down the page to the “Rubrics” section and click “Add Rubric.”
Check the box for the rubric you want to use. (If you don’t see the rubric you created, you may need to go back to the rubric and change its status to “Published.”)
Click “Add Selected.”
Attach a Rubric to a Dropbox Folder
When you attach a rubric to a dropbox folder, the rubric will be on the first page students see when they go in to submit their files to the folder. That way, students can make one last check of what’s expected before uploading files.
You can go into the folder and use the rubric to grade. The rubric will automatically tally the score and save it as the score for that assignment. If the folder is associated with a grade item, the score will get pushed into Grades, too.
However, students won’t see the rubric in Grades. They will see the score and any feedback from the rubric. But to see the rubric itself, a student will have to go to “Assessment” and click “Dropbox.” In the “Feedback” column of the folder list, click “View” for the folder. The rubric and all the levels you selected for that student will display.
To attach a rubric to an an existing dropbox folder…
Click “Assessment” on the navbar.
Click “Dropbox.”
Click the small, downward-pointing arrow next to the name of the folder you want and choose “Edit Folder.”
Scroll down to the “Rubrics” section and click “Add Rubic.”
Check the box in front of the rubric you want to add and click “Add Rubric.”
If when you attempt to select a rubric you don’t see the one you created for the assignment, you may have to go back to “Rubrics” and change the rubric’s “Status” to “Published.”
Attach a Rubric to a Discussion Topic
In “Discussions,” go to the “Edit Topic” screen for the discussion topic where you want to add a rubric. If you create a new topic, you will start in “Edit Topic.” If you have an existing topic, click the arrow next to the topic’s name and choose “Edit Topic.”
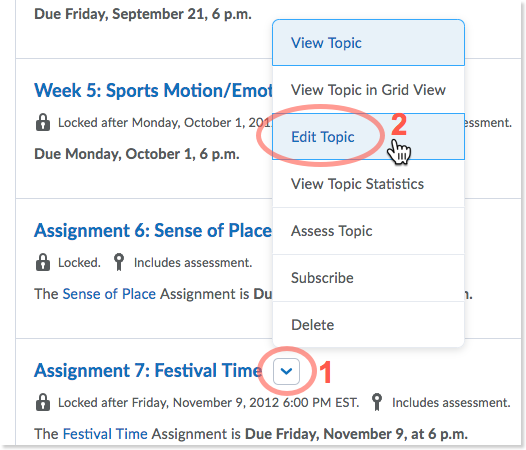
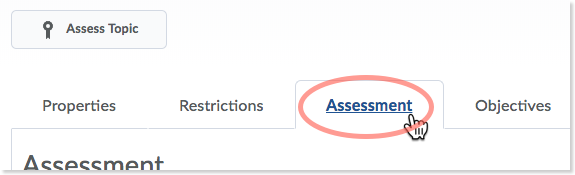
Click the “Assessment” tab.
Click the “Add Rubric” button.
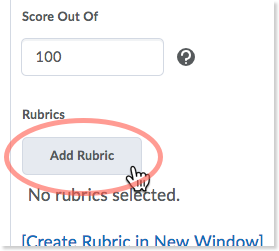
Select the box in front of the published rubric you want and click “Add Selected.”
Click “Save and Close.”
How are rubrics used in Grades vs Discussions?
This page shows you how to attach rubrics to activities and helps you decide where to place your rubrics.
What it Means to Attach a Rubric
A rubric can help you quickly and precisely grade an assignment, but only if you first attach it to another Pilot tool, such as a grade item or dropbox folder.
The table you create in the “Rubrics” tool is like a template. When you attach the rubric to a grade item, for example, it’s like making a copy of the rubric that you can use in “Grades.” The copy is no longer connected to the template in the Rubrics tool.
That means you can use one rubric on multiple assignments and in multiple places. It also means that copies of a rubric don’t talk to each other. So even if you attach the same rubric to both a dropbox folder and a grade item, the markup you do in the dropbox folder won’t carry through to the rubric in Grades. Students will have to view the copy that’s in the dropbox to see which cells you selected.
The table below summarizes the pros and cons of attaching a rubric to the three tools where people most commonly attach rubrics: a grade item, a dropbox folder, and a discussion topic.
| Tool | Description |
|---|---|
| Grade Item | The professor grades the assignment in “Grades.” Pilot calculates the score and pushes it to the grade item. Students see the score and feedback in Grades, and can click a link in Grades to open the rubric and see how the professor scored it. |
| Dropbox Folder | Students see an ungraded version of the rubric when they enter the dropbox. So they have a way to check that they’ve satisfied requirements before they upload files.
Faculty may grade in the dropbox. In that case, the score and feedback from the rubric becomes is pushed into the folder for the assignment. In turn, the score and feedback are pushed to a grade item, if one is attached to the folder. Students will see the score and feedback in Grades, but will have to go to the dropbox to see the scored rubric. |
| Discussion Topic | If you want to use a rubric to grade a discussion topic, it’s usually best to attach the rubric to a Grade item and do the grading in the Grades tool.
Students can click an icon in the discussion topic to see an ungraded rubric, like they would see in a dropbox folder. Faculty can use that rubric to calculate a grade within the discussion topic. However, the score goes nowhere. You must manually transfer it to Grades. Students can’t see the graded rubric from within the discussion topic, which is why it’s usually best to grade with a rubric that’s attached to a grade item. |
Attach a Rubric to a Grade Item
A rubric attached to a grade item shows up in Grades, where students are used to looking for assessment results. When a rubric is attached to some other tool, students may be less likely to see the grading you did with the rubric.
To attach a rubric to a grade item…
Click “Grades” on the navbar.
In “Manage Grades,” click the name of the grade item with which you want to use the rubric. That will take you to the “Properties” tab for that grade item.
Scroll down the page to the “Rubrics” section and click “Add Rubric.”
Check the box for the rubric you want to use. (If you don’t see the rubric you created, you may need to go back to the rubric and change its status to “Published.”)
Click “Add Selected.”
Attach a Rubric to a Dropbox Folder
When you attach a rubric to a dropbox folder, the rubric will be on the first page students see when they go in to submit their files to the folder. That way, students can make one last check of what’s expected before uploading files.
You can go into the folder and use the rubric to grade. The rubric will automatically tally the score and save it as the score for that assignment. If the folder is associated with a grade item, the score will get pushed into Grades, too.
However, students won’t see the rubric in Grades. They will see the score and any feedback from the rubric. But to see the rubric itself, a student will have to go to “Assessment” and click “Dropbox.” In the “Feedback” column of the folder list, click “View” for the folder. The rubric and all the levels you selected for that student will display.
To attach a rubric to an an existing dropbox folder…
Click “Assessment” on the navbar.
Click “Dropbox.”
Click the small, downward-pointing arrow next to the name of the folder you want and choose “Edit Folder.”
Scroll down to the “Rubrics” section and click “Add Rubic.”
Check the box in front of the rubric you want to add and click “Add Rubric.”
If when you attempt to select a rubric you don’t see the one you created for the assignment, you may have to go back to “Rubrics” and change the rubric’s “Status” to “Published.”
Attach a Rubric to a Discussion Topic
In “Discussions,” go to the “Edit Topic” screen for the discussion topic where you want to add a rubric. If you create a new topic, you will start in “Edit Topic.” If you have an existing topic, click the arrow next to the topic’s name and choose “Edit Topic.”
Click the “Assessment” tab.
Click the “Add Rubric” button.
Select the box in front of the published rubric you want and click “Add Selected.”
Click “Save and Close.”