Customizing Your Pilot Page
On this page:
- About Customizing Your Pilot Page
- How do I edit my profile?
- How do I change my account settings?
- Can I change notification settings in Pilot?
- How do I enable or disable tools in my course?
- Can I make changes to the navigation bar?
- What is Course Builder?
- What is Course Design Accelerator?
- How do I edit my homepage?
- What are widgets?
- How do I add widgets to my homepage?
- I’m not seeing a widget I want to use, can I create my own?
About Customizing Your Pilot Page
Pilot offers many ways to customize your courses. This page provides insight on how to make changes to your homepage, edit your profile, and change account settings to best fit your instructional needs and preferences.
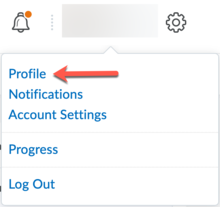
How do I edit my profile?
From any page within Pilot, click on your name in the upper right and then choose Profile. You can add your picture and fill in your profile information. This information will be viewable by everyone enrolled in the course. Your profile picture will be displayed with your posts under discussions as well as in the Classlist.
How do I change my account settings?
User Preferences (Account Settings)
From any page within Pilot, click on your name in the upper right corner of the screen and then choose Account Settings. This page provides different options for how Pilot presents information within Pilot. You can change the font size throughout the platform as well as setting related to videos, reading content, and discussion boards.

Can I change notification settings in Pilot?
From any page within Pilot, click on your name in the upper right and then choose Notifications. This page will provide options for how Pilot notifies you of activity within your courses. From the notifications page, you have the option to add your email and phone number. There is also a list of activities with options to get notifications vis SMS or Email. Check the boxes for your preferences and click on the blue Save button at the bottom of the screen.

How do I enable or disable tools in my course?
If there are tools listed on the Navigation Bar that you aren’t using, you can hide those items. Conversely, you can reveal tools, such as the Attendance tool. To do this, go to your course page and click on “Course Admin." Select “Tools.” It is located under the Administration category.

From the Tools page, use the switches on the right to enable or disable the tools that will be used in your course. You can also customize the name of the tool.

Changes occur immediately so there is NOT a “Save” button on this page! Disabling Tools will cause them to be hidden and unavailable in the menus within the course while enabling them will cause them to appear in their default menu location. External tools, such as Collaborate Ultra, can’t be turned on and off this way. The Tools page only lists tools that are a built-in part of Pilot.
Can I make changes to the navigation bar?
Editing the Navigation Bar
From your course page, you can make changes to the navigation bar by clicking on the square icon with the ellipsis in the center. This can be found in the upper right corner beneath your name. Select Edit this Navbar.

On the editing page, you have several different customization options. One option is to rearrange the existing links by clicking and dragging them to put them in your preferred order.
If any of the navigation links are grouped, you'll see a small arrow next to the title. To change what is included in the group, click on the title of the link and it will open a small window where you can edit the properties. You can change the title, upload icons, write a description, and add or remove links. If you make any changes, make sure you click on the blue Save button.
If you don't like the links that are currently located on your navigation bar, you can also add or remove the links that are not grouped. To add, you will click on the gray button labeled Add Links. This will provide you with a list of tools throughout Pilot. Select the box next to the one you want to use and click on the blue Add button.
To remove a link from the navigation bar, simply hover your cursor over the title and click on the X that appears to the right. Once finished with all editing, make sure to hit the blue Save and Close button.
What is Course Builder?
The Course Builder is great when you want to arrange your course before you have all the parts. It works much like building from within Content. The biggest difference is that Course Builder gives you placeholders to represent prospective content.
To access the Course Builder…
Click “Course Admin” on the course navbar.
Click “Course Builder.”
The following describes three parts of the Course Builder and how they work together.
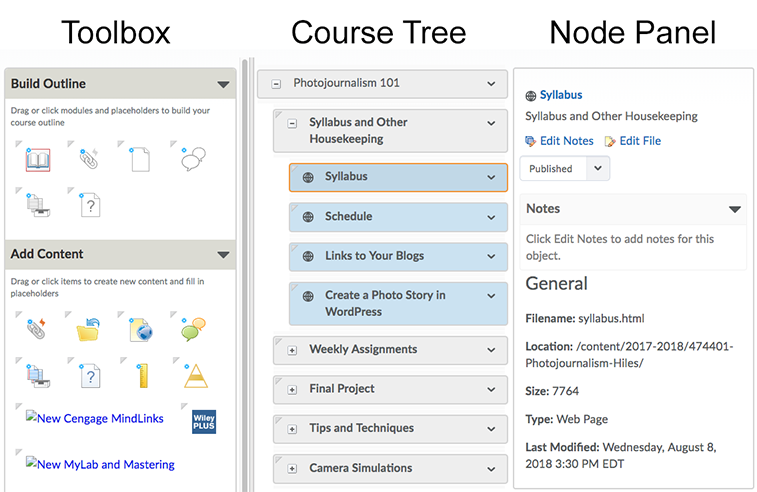
1. Course Builder’s Toolbox
The first panel, the one on the left, is the Toolbox. The Toolbox itself has three sections.
Build Outline
In the “Build Outline” section are a number of icons you can drag into the second panel, or Course Tree, to build the Content area in your course. The first one creates modules. The rest of the icons in the “Build Outline” section create placeholders things that don’t yet exist, such as links, documents, discussions, dropbox folders, and quizzes.
Add Content
The “Add Content” section is where you can add objects and activities and actually create those as you add them. When you drag an item into the Course Tree, a window opens where you can create that new item.
This window is much scaled-down. It doesn’t have a lot of options you see if you create an item in that items tool. If you go into Dropbox and create a folder, for example, that interface will let you do things you can’t while in the Course Builder. But this saves time and speeds up course creation.
Browse Tools
This section of the toolbox lets you find existing activities, such a quizzes you already made, and add them to the table of contents.
2. Course Builder’s Course Tree
The middle panel represents your Table of Contents. In fact, if you go to “Content” after building out the course tree, you will see that you have actually built your Table of Contents.
3. Course Builder’s Node Panel
When you select an item in the Course Tree, the Node Panel shows information and offers options for that item.
What is Course Design Accelerator?
This tool provides a list of recommended items to consider when designing your course. You can use this tool if you're building a course from scratch or if you'd like to review a course you've made to see if there is anything you may have missed.
To access the Course Design Accelerator, click on Course Admin in your navigation bar. Under the Site Resources category, click on Course Design Accelerator.

Once you've accessed the Course Design Accelerator, there are several recommendations and links to facilitate making changes to your course. See the image below for an example of some of the recommended items.

How do I edit my homepage?
Make an Editable Copy of the Homepage
Before you can make any changes to the homepage, you need to make a copy. To do this, click on Course Admin on the navigation bar in your course. From the Course Administration page, click Homepages. From here, click the down caret next to Course Homepage and choose Copy.

Now you will see a blue link that says “Course Homepage – Copy.” That is your editable homepage. Before you can use it, you have to make it active. Do this by selecting the dropdown menu below Active Homepage and selecting Course Homepage - Copy. Click Apply.

Now you can click that “Course Homepage – Copy” link and begin to modify the homepage.

Edit the Homepage
On the Edit Homepage page, the first options you have are to rename this editable version of the homepage and to provide a description. Both of these options are for your benefit only. Students won’t see them. You also have the ability to change your homepage type.
Homepage “Types”
1. Widget-Based Homepage
The default homepage is widget-based. Widgets are sections of content that provide information and links to important places and information in a course. With this type, Pilot gives you options to change the layout and to decide which widgets are displayed for the students. For more information, see, "How do I add widgets to my homepage?"

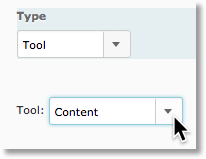
2. Tool-Based Homepage
When you select the “Tool” type, it reveals a second menu to select which tool you want as your homepage. If you select “Content,” for example, you and your students will go directly to the table of contents when you enter the course, there will be no widget-based homepage.
3. External URL-Based Homepage
If you choose an external URL-based homepage, then Pilot will keep the black “minibar” at the top of the page, its banner, and its navigation bar, with links to Home, Content, Communication, etc. Below the navigation bar will be the external web page whose URL you provide.
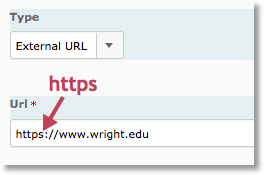
Be sure to begin the URL with “https” at the beginning. If you just use “http” without the s, many browsers will block the page from loading because it isn’t safe to load a non-secure page in the frame of a secure page.
What are widgets?
The default homepage type for courses in Pilot is widget-based. Widgets are rectangular sections of content that provide information and links to important places and resources within a course. Typically, there is a News or Announcements widget, Content Browser widget, and a Calendar widget.
When editing a homepage, you have the option to add, remove, and rearrange widgets. If Pilot does not have exactly what you're looking for, you can even create your own. See our other FAQs for more information.

How do I add widgets to my homepage?
Make Your Homepage Editable
For written instructions on this process, see, "How do I edit my homepage?"
Header
For most courses, it’s best to leave the “Include homepage header” box unchecked, as it will redundantly repeat the course name beneath the banner.

Layout
Just below the “Layout” heading is an icon that shows the current homepage layout. By default, it has two panels, one large, one small. Click Change Layout to choose from a list of eight configurations for your homepage. However, using a one- or two-column layout will respond best if students are using mobile devices to access the course.

Add Widgets
A “Widgets” box at the bottom of the page represents the chosen layout and the widgets that are in it. Below is a “Basic” two-panel layout. Add a widget to either panel by clicking the panel’s “Add Widgets” button. To choose from the list of available widgets that opens, check the box in front of each one you want, then click “Add.”
Your newly added widgets will now appear below any widgets previously in the panel. This is just a representation of how your widgets are arranged. You won’t actually see how the widgets look until you view them on the homepage. Be sure to click “Save” or “Save and Close” to keep your changes.
Rearrange or Remove Widgets
To move a widget, hover over it until your cursor turns to four arrows. Then drag the widget to the where you want it, including to different panel.
When you hover over a widget on this page, a circle with an X in it will appear. Click the X to remove the widget from your homepage.

Style Widgets
You can change a widget’s title and whether it can be minimized by first clicking on “Home” on the navigation bar in your course. From the homepage, click the down caret next to any of the widget's names and choose “Style this widget.”
I’m not seeing a widget I want to use, can I create my own?
Make a Custom Widget
Yes, you can create your own widgets! You can add a welcome widget to your homepage or introduce yourself with a “bio” widget that includes your picture and brief summary of your experience in your field. Custom widgets can also include links to external resources and “replacement strings” that will pull information from Pilot into your message.
To create a widget, follow the instructions below:
Click “Course Admin” on the navigation bar. Then click “Widgets.”
On the Widgets page, click the blue “Create Widget” button.
Give your widget a name. This will appear in the title bar at the top of the widget when you place it on your homepage.
If you want, include a description to help you remember what the widget does.
Click the “Content” tab. (The name and description will be saved when you switch tabs.)
On the Content tab, you will have Pilot’s HTML editor, which has a word processor-like toolbar. You can write, edit, and format text, insert images, add video, and more.
Personalize Your Message
Greet Students By Name
You can have Pilot fill in a student’s name. So a student named Joe Cool will see a greeting on the homepage that says “Hello Joe Cool,” for example. To do this use “replacement strings,” which are bits of text that Pilot recognizes and replaces with data.
Pilot will replace {FirstName} with the first name of whoever is viewing your course. Likewise, it will replace {LastName} with the last name of whoever is viewing your course. So, if you type “Welcome {FirstName} {LastName}” in your widget, when Joe Cool is in your course, he will see “Welcome Joe Cool” in your widget.
If you want to check your work before you add the widget to your course, click the “Preview Widget” button near the top of the widget editing page. You will see your name displayed in the preview.
Make a Clickable Email Address
If you include your email address in your contact information, it won’t automatically get turned into a clickable link the way you may be used to seeing in other applications. But you can make it clickable:
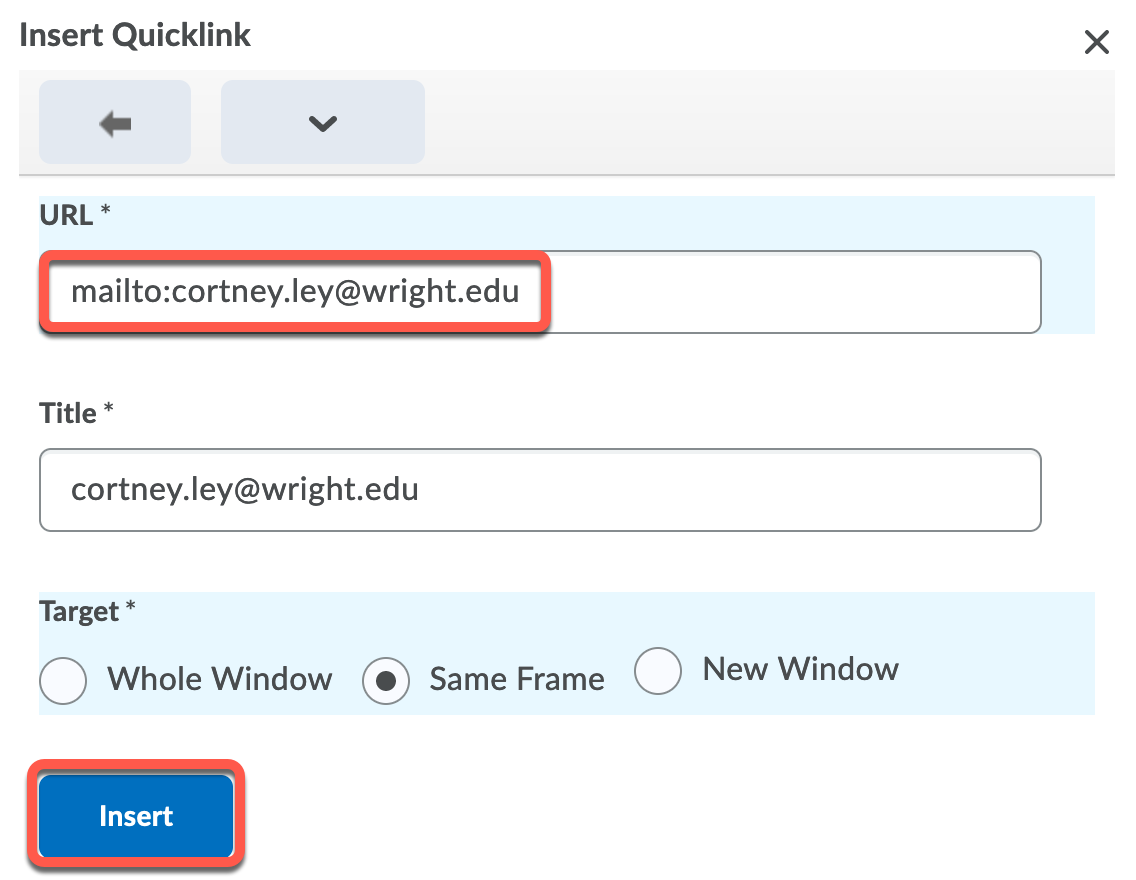
Type the email address. (hint: Hit the space bar a couple times after it if you want continue the sentence without having the rest of the text be part of the link.
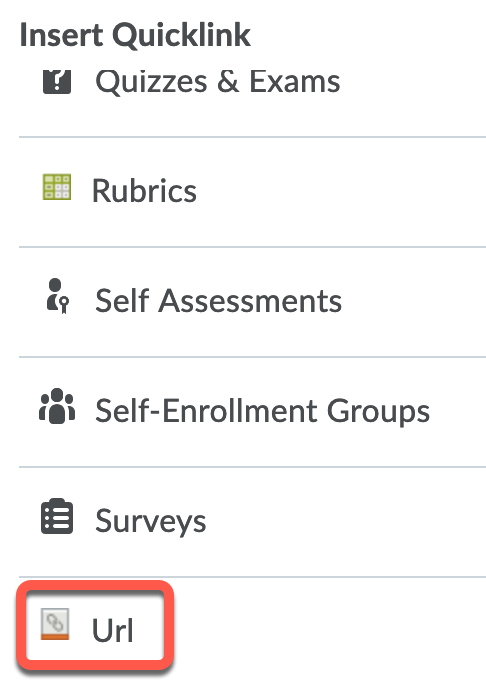
Highlight the email address and click the Insert Quicklink icon. This icon can also be found in the toolbar.

On the “Insert Quicklink" window, scroll down toward the bottom and click Url.
Fill in the URL box with mailto: followed by your email address with no spaces. Click “Insert” and your email address will launch an email client when it’s clicked.
Link to Content Items, Discussion Topics, Quizzes, etc.
When you click “Insert Quicklink” on the toolbar, you’ll see a list of tools available in Pilot. You can make a direct link to many things in your course. If you choose the Quizzes option, for example, you’ll see a list of your quizzes. Just select the one you want to make a link to and Pilot will insert that link into the content of your widget.