Inserting Images
Adding a Photo
Step 1 of 4: Place cursor
Place your cursor within the WYSIWYG where you would like the photo to go.
Click the "Add media" icon in the toolbar (second to last; looks like a little photo with a mountain)
Step 2 of 4: Upload/Pick image
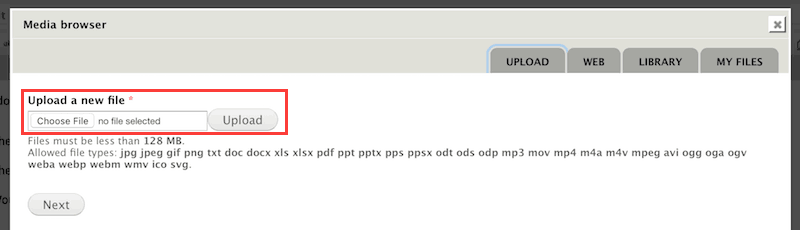
- (Figure 1) Use the "Choose File" button to find the image you want to upload on your system and then click Submit, or
- (Figure 2) Use the Library or My Files tabs to select an image that's already been uploaded to the CMS. When you find the image you want, click it, scroll down, and click Submit.
Note: While you will see files besides images in the Library, we do not recommend using this interface to link to files. Instead, see the File Attachments page in the user guide.

Step 3 of 4: Set file properties for new upload
(If you chose a file from the Library, skip to Step 4, as this screen only has to be completed when a file is first uploaded).
The next two screens may be a little confusing until you get the hang of it, as the fields are very similar on both.
The media upload system is designed to let you reuse assets; so this screen lets you change properties of the file everywhere it is used. The next screen will let you change properties of the image as it's being inserted into this page.
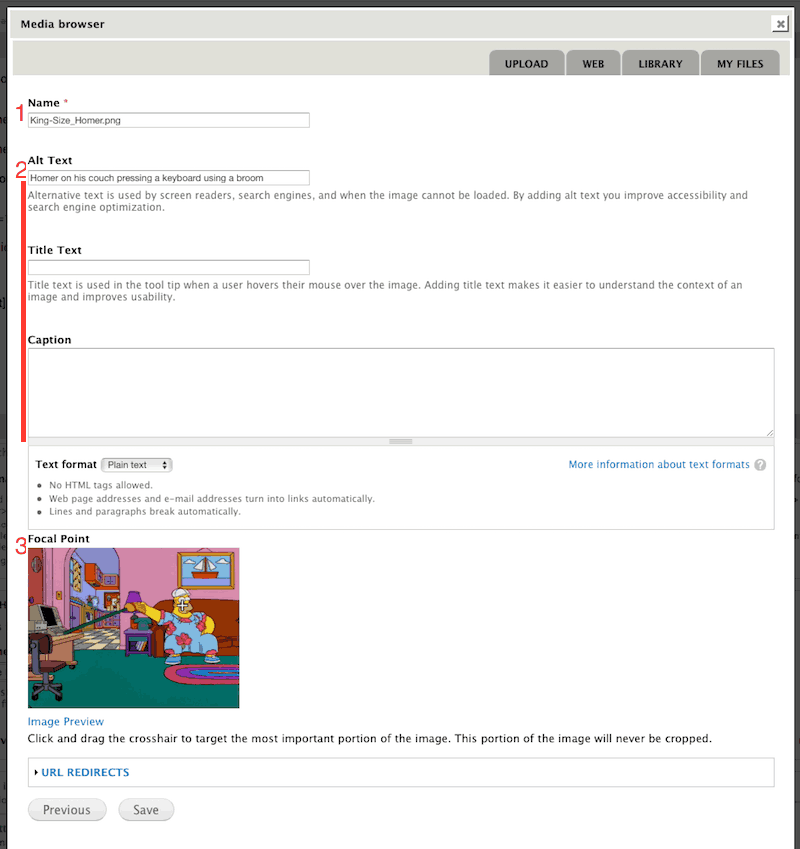
- Name of the asset in the library. This defaults to the filename, but you can set it to something more descriptive if you want to make it easier to find in the library.
(Note: This does not change the actual name of the file, so you can't use this to try to change the URL.) - Values for fields that can be overridden on the next screen. Essentially, these act as default values if the file is re-used.
- Alt text: A textual description of what is going on in the image. This is required for accessibility if the image is not purely decorative. Screen reader users and search engines will get this text since they are unable to perceive the image visually.
- Title text: This can generally be left blank. When you hover over the image with a mouse, this text is shown as a tooltip, but it's not accessible to touch screen or keyboard users.
- Caption: The contents of this field display below the image. You can use basic formatting, like bold and italic, in this field.
- Focal Point: Moving the crosshair to the most important part of the photo makes sure that that part won't get cropped if it's displayed with an image style that crops to a certain aspect ratio, such as the square thumbnails in the media library, or if you choose such an image style on the next screen.
Step 4 of 4: Set options for embedding into the page
This screen lets you adjust the size, position, and properties of the image before it is embedded.
- Image style: Lets you apply an image style, which does things like resize the image or crop it to a certain aspect ratio. If left at None, the image will be inserted into the page exactly as it was uploaded. If the image is huge (you had to scroll past it to get to this option), then you should either apply an image style or crop it using a tool such as Photoshop and re-upload it.
(Advanced Note: for those who have used the Image Properties dialog to resize images, that does not resize the file, only the dimensions at which the file is displayed. Thus, the user could potentially have a huge download for an image that is displayed at the size of a postage stamp.) - Alignment: Here you can choose to have the image float to the left or right of text on the page.
(Advanced Note: for those who have used the Image Properties dialog to set alignment, that will not behave as intended when the Caption field is used.) - Field values (they will already be populated if you filled any of them out in Step 3):
- Alt text: A textual description of what is going on in the image. This is required for accessibility if the image is not purely decorative. Screen reader users and search engines will get this text since they are unable to perceive the image visually.
- Title text: This can generally be left blank. When you hover over the image with a mouse, this text is shown as a tooltip, but it's not accessible to touch screen or keyboard users.
- Caption: The contents of this field display below the image. You can use basic formatting, like bold and italic, in this field.
Click Submit to close the wizard and see the image inserted in the page. The caption will not display within the WYSIWYG; you must save the page to see the caption.

Changing a Photo
To change the photo itself, you will need to click the photo, delete it, and add a new one.
To change properties of the photo, such as the caption, alignment, or size, click the image then click the "Add media" icon in the toolbar . The Media wizard should jump straight to Step 4 described above.
Accessibility Considerations
Provide alternative text for any non-text content, such as images. This includes images that are necessary to understand contents on the page or that enhance the understanding of content on the page. Use simple words to describe the image's function rather than describing the appearance.
For images that are "pure decoration," defined by WCAG as "serving only an aesthetic purpose, providing no information, and having no functionality," the alternative text should be left blank to cut down on the amount of page clutter presented to screen reader users. See WCAG 2.0, guideline 1.1.1.