Virtual Private Network (VPN)
On this page:
- About Virtual Private Network (VPN)
- Available To
- Getting Started—Download and Install VPN
- Connecting to VPN Using Two-Factor Authentication
- Usage Instructions—Use VPN to Access Your Network Files
- Policy
About Virtual Private Network (VPN)
The AnyConnect VPN from Cisco allows authorized users to securely connect to the WSU data network from the campus wireless network or from off-campus using various commercial Internet Service Providers (ISPs) (e.g., MSN, AOL, Roadrunner, SBC, etc.). Using AnyConnect, wireless and remote users are connected to the university's internal network as if they were directly connected to the campus network. This allows WSU wireless and remote users to access servers and other devices restricted to WSU network users and isolated from the outside. In addition, a VPN connection allows the user to access all network files (Home H:\ and shared drives K:\).
In general, off-campus users who only connect to WINGS or WINGS Express do not need to use the AnyConnect VPN connection. Users who access their email through WINGS or who utilize IMAP to access mail.wright.edu also do not need to use the AnyConnect VPN connection for email.
Please note: Using VPN software from CaTS allows you to access your H:\ drive personal space or K:\drive departmental shared space ONLY. If you are trying to access your office computer, including files and applications stored on that computer, note that the VPN software does not support this. Also, other software programs that connect remotely to your computer are not supported by CaTS, and we cannot assist in creating or maintaining those connections.
Available To
Students, Faculty, Staff
Getting Started—Download and Install VPN on Your PC, Macintosh, or Mobile Device
Learn how to download, install, and use the AnyConnect VPN software for your PC or Macintosh computer. To download the AnyConnect VPN client on your PC or Mac, you will be required to read and accept our VPN usage license agreement.
If you've got an iOS or Android smartphone, you can use the Cisco AnyConnect Mobile App to access the university's VPN connection.
Use VPN Software on Your PC or Macintosh
Please read the VPN Policy. If you agree to the terms and conditions, click the I Have Read button. You will be required to enter your campus username and password to continue.
Once you have agreed to the policy and entered your login information, you will be taken to a page with the AnyConnect VPN client download link and installation instructions.
Please contact the Help Desk at 937-775-4827 with any questions about VPN, or for assistance installing the VPN client.
Use VPN Software on Your Mobile Device
Cisco AnyConnect VPN is now available as a mobile app on iOS and Android operating systems. The following links will take you to the download and setup instructions for your mobile device. Please note: the instructions provided are located on Cisco's website, therefore, they will not have specific Wright State connection information. Please refer to the WSU Connection Information link below to obtain our specific connection information that can be used with Cisco's instructions. If you have any questions, feel free to contact the CaTS Help Desk at 937-775-4827.
iOS Devices (iPhone, iPad, etc)
To use Cisco AnyConnect on your Apple device, you will need to download it from the App Store
Open the App Store on the device you want to connect to VPN.
Search for Cisco AnyConnect. Download the version that says New Cisco AnyConnect.
![]()
WSU Connection Information (PDF)
Android Devices
To use Cisco AnyConnect on your Android, you will need to download it from the Google Play Store
Open the Google Play Store on the device you want to connect to VPN.
Search for Cisco AnyConnect.
![]()
WSU Connection Information (PDF)
Connecting to VPN Using Two-Factor Authentication
Beginning May 6th, 2021, you will need to be enrolled in two-factor authentication to be able to access Wright State's VPN either through a passcode, push, or phone call (faculty and staff only). Read more about two-factor authentication at wright.edu/2fa.
Instructions for Windows
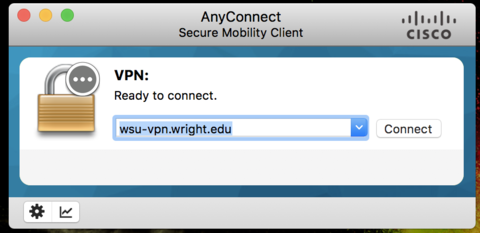
Double click the Cisco AnyConnect Secure Mobility Client icon on your desktop, or choose Start >> All Programs >> Cisco >> Cisco AnyConnect Secure Mobility Client >> Cisco AnyConnect Secure Mobility Client. The following screen will appear.
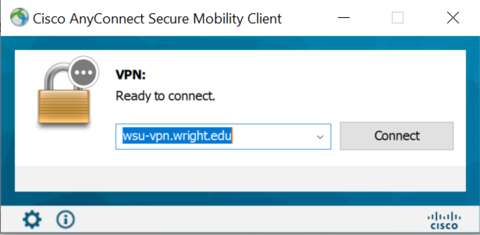
If the "Ready to connect." field is empty, enter wsu-vpn.wright.edu. Click Connect.
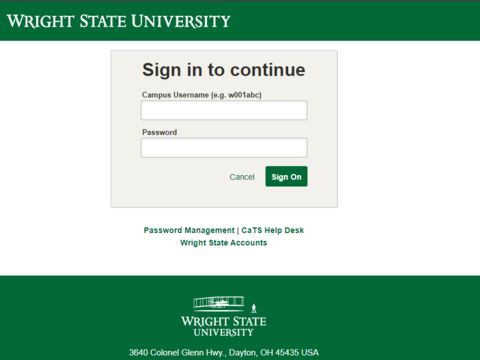
Your default web browser will open and direct you to the Wright State login page; enter your Campus 'w' username and password, and click Sign On.

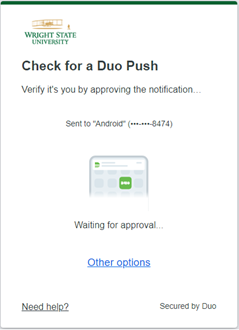
By default, Duo will attempt to send a Push notification to your device, however you can also select 'Other Options' on the initial Duo prompt. You can find more information about the different authentication methods at https://www.wright.edu/information-technology/two-factor-authentication#...
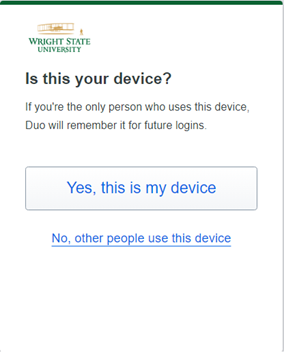
Once you successfully authenticate using Duo, you will receive a prompt asking if you are authenticating using a personal device. If so, and you would like the specific browser you are using to remember your login information for next time, select Yes, this is my device.
Click the Accept button to accept the WSU VPN usage agreement. The VPN client should now be running in the background of your computer. You will now be able to connect to the secure university resources that you have access to. For example, you can access your personal and departmental network files from home.
Disconnect
To disconnect from the VPN service, right-click the VPN client icon in your system tray and choose VPN Disconnect.
Instructions for Macs
Before connecting to the VPN, make sure that your Finder Preferences are set to show connected servers on the desktop. To do this, go to Finder >> Preferences then check the box for Connected servers. This will ensure that your network drive mounts appear on the desktop.
Double click your Macintosh HD icon, then click on Applications.
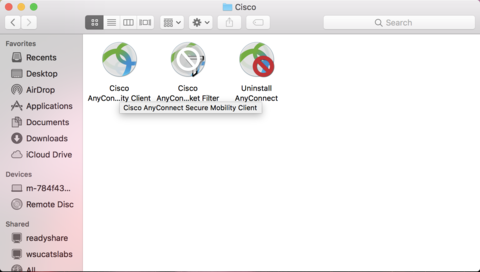
Find the Cisco folder and double click on Cisco AnyConnect VPN Client.
If the "Ready to connect." field is empty, enter wsu-vpn.wright.edu. Click Connect.
Your default web browser will open and direct you to the Wright State login page; enter your Campus 'w' username and password, and click Sign On.
By default, Duo will attempt to send a Push notification to your device, however you can also select 'Other Options' on the initial Duo prompt. You can find more information about the different authentication methods at https://www.wright.edu/information-technology/two-factor-authentication#...

Once you successfully authenticate using Duo, you will receive a prompt asking if you are authenticating using a personal device. If so, and you would like the specific browser you are using to remember your login information for next time, select Yes, this is my device.

Click the Accept button to accept the WSU VPN usage agreement. The VPN client should now be running in the background of your computer. You will now be able to connect to the secure university resources that you have access to. For example, you can access your personal and departmental network files from home.
Disconnect
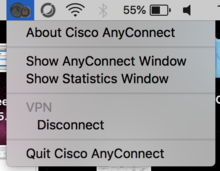
To disconnect from the VPN service, click the VPN client icon in the top right corner and choose Disconnect.
Usage Instructions—Use VPN to Access Your Network Files From Your Home Computer
The following instructions show you how use the VPN connection to access your WSU personal and (if applicable) departmental files after you have downloaded and installed the Cisco AnyConnect VPN Client.
Instructions for Windows
Access Your Files
Connect to the VPN using the above instructions.
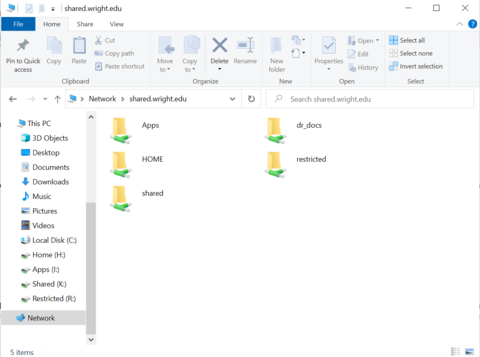
To access your shared network drives, open File Explorer, type \\shared.wright.edu, and hit Enter. You should now see and be able to access the network drives you have access to.
Create a New Shortcut
Create a new shortcut on your Windows desktop to access your network drives. You can do this by right-clicking on an open area and selecting New >> Shortcut. Creating this shortcut only needs to be done one time; once created the shortcut can be used to access your Home directory (personal files) and, if applicable, your Shared directory (departmental files).
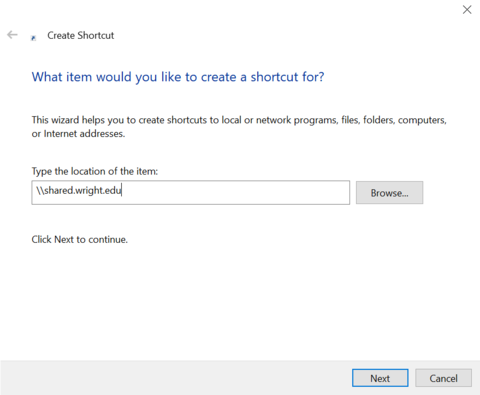
In the Create Shortcut window, inside the Type the location of the item: field, type one of the following, then click Next.
Faculty & Staff: Type (without the brackets) [\\shared.wright.edu].
The system will attempt to connect to your network drives. If prompted, enter your Campus 'w' username and password:
In the Username field: Type (without the brackets) wright.edu\[your campus "w" username].
In the Password field: Type your campus password, then click OK.
If you are still unable to connect, contact the CaTS Help Desk at 937-775-4827.
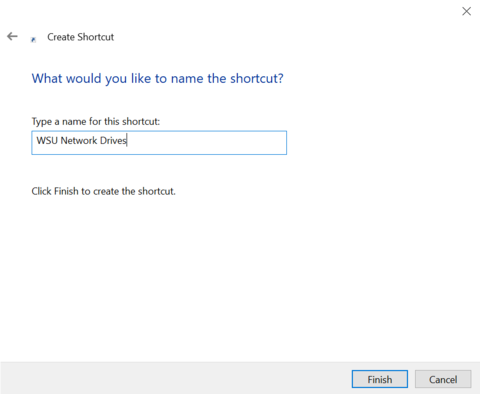
The system will again attempt to connect to your home drive. If it is successful, you will see a window asking you to name the shortcut or give it a title. If the connection is not successful, make sure you are entering the username and password correctly. If you continue to experience problems, contact the CaTS Help Desk at 937-775-4827.
Type an appropriate title for the shortcut. A good example is "WSU Network Drives." Click Finish.
Your shortcut will now appear on your Windows desktop. Double click the shortcut to access your network drives. Remember, you must be connected to the WSU VPN for your shortcut to work.
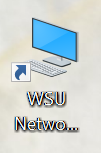
In the future, you will not need to go through the process again of creating the shortcut as it will remain on your Windows desktop. Once you connect to the WSU VPN, just double-click on the shortcut you made. You may be prompted to enter your password, and then your network drives will appear.
Instructions for Macs
Access Your Files
Note: Before connecting to the VPN, make sure that your Finder Preferences are set to show connected servers on the desktop. To do this, go to Finder >> Preferences then check the box for Connected servers. This will ensure that your network drive mounts appear on the desktop.
Connect to the VPN using the above instructions.
From the Finder menu, click Go >> Connect to Server.
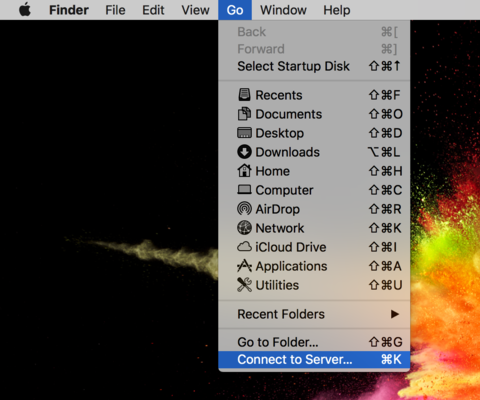
In the Connect to Server window, in the Server Address field, type smb://shared.wright.edu/. Click Connect.
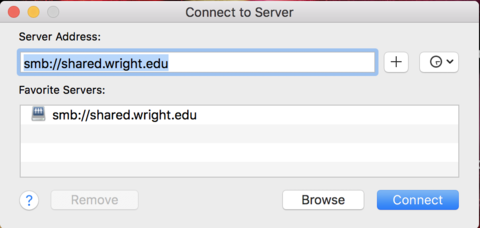
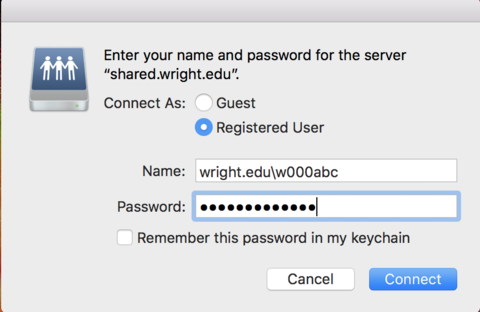
Enter your Campus 'w' username and password:
In the Name: field: Type (without the brackets) wright.edu\[your campus "w" username].
In the Password field: Type your campus password, then click Connect.
If you are still unable to connect, contact the CaTS Help Desk at 937-775-4827.
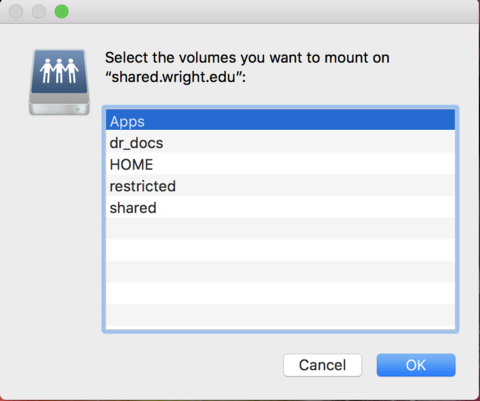
You should now see a list of the network drives you have access to (Home, Shared, Restricted, etc). Select the drive you want to mount to your desktop, and click OK. Repeat the above steps in order to mount additional network drives to your desktop.
Create an Alias
If you would like to create an alias for your network drive, hold down the Control key and click the drive mount on your desktop, then select Make Alias.

You will now see an alias appear on your desktop. Give the alias an appropriate title, such as "WSU Network Drives."
To connect to your network drives in the future, first connect to VPN and then double-click on the alias you created. You will be prompted to enter your username and password before you can access your files.