Wright State Xerox printers allow you to print on multiple paper types, such as letterhead, envelopes, labels, and more. This guide gives instructions on this process. If you need further assistance, contact the CaTS Help Desk at (937) 775-4827 or send an email to helpdesk@wright.edu.
There are two ways to print to alternative media using Xerox printers.
Method #1: Secure Print Option (Recommended)
Method #2: Direct Print Option
Method #1: Secure Print Option (Recommended)
Note: This method uses the Secure Print option when printing your document. This is the preferred method as it does not interfere with other print jobs.
- With your document open, select the Print function. This is usually located under the File menu in most applications.
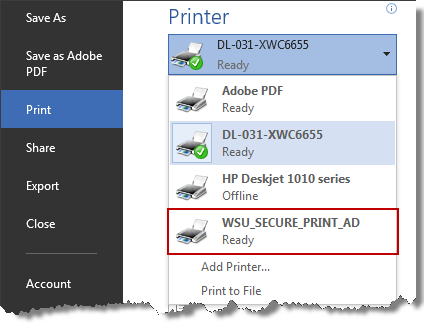
- Select the WSU_SECURE_PRINT_AD or WSU_SECURE_PRINT_NON_AD printer. If this option isn't available to you, visit the Secure Print website for installation instructions.
- Select the Printer Properties button (usually located directly under the selected printer).
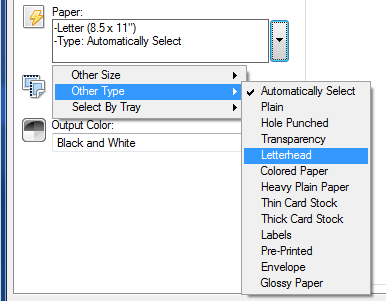
- Under the Paper section, click on the drop-down arrow to the right.
- Choose the paper size and type you want to print to (this example shows Letterhead).
- Click OK.
- Click Print. Enter your campus username and password if prompted.
Note: Your print job has now been sent to the secure print queue, but won't print until you release the job by swiping your Wright1 Card or logging in to the printer. - Go to the printer, but wait to swipe your Wright1 Card or log in.
- Open a printer tray and insert your desired media (letterhead, labels, etc.)
- Once you close the tray, options will appear on the printer screen, asking you to confirm what type of media you placed in the tray.
- Using the options at the bottom, select the size and type of the media you inserted. You must match this to the same setting you used earlier in steps 3-5.
- Tap the Confirm button in the top right.
- Swipe your Wright1 card, tap on the name of your print job, and then tap Print.
- Once your print job is complete, open the tray and replace the original media (usually plain printer paper).
- IMPORTANT: Once you close the tray, please follow steps 10-12 again to set the printer back to original settings. Failing to do this will stop further print jobs to this tray.
Method #2: Direct Print
Note: This method uses the Direct Print option, which will send your print job to your selected printer immediately. The drawback to this method is that the printer becomes unusable by anyone else until you have printed your document on the selected media. Printing with Method #1 above is recommended in order to avoid this situation.
- With your document open, select the Print function. This is usually located under the File menu in most applications.
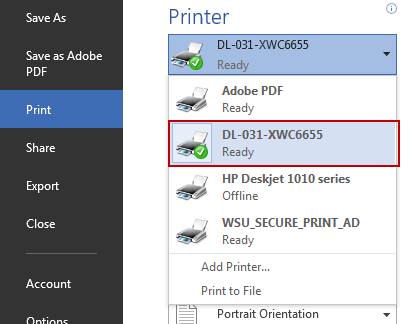
- Select the printer you want to print to. If no printer is installed, visit the Direct Print website for installation instructions.
- Select the Printer Properties button (usually located directly under the selected printer).
- Under the Paper section, click on the drop-down arrow to the right.
- Choose the paper size and type you want to print to (this example shows Letterhead).
- Click OK.
- Click Print. Enter your campus username and password if prompted.
Note: Your print job has now been sent directly to the printer and is awaiting the selected media type. - Go to the printer. On the top left of the printer screen you should see a note that says "One or more queued jobs need resources."
- Reminder: At this point, no one else can print because the printer is waiting for you to insert your media and change the appropriate settings.
- Open a printer tray and insert your desired media (letterhead, labels, etc.)
- Once you close the tray, options will appear on the printer screen, asking you to confirm what type of media you placed in the tray.
- Using the options at the bottom, select the size and type of the media you inserted. You must match this to the same setting you used earlier in steps 3-5.
- Tap the Confirm button in the top right. Your job will now print.
- Once your print job is complete, open the tray and replace the original media (usually plain printer paper).
- IMPORTANT: Once you close the tray, please follow steps 10-12 again to set the printer back to original settings. Failing to do this will stop further print jobs to this tray.